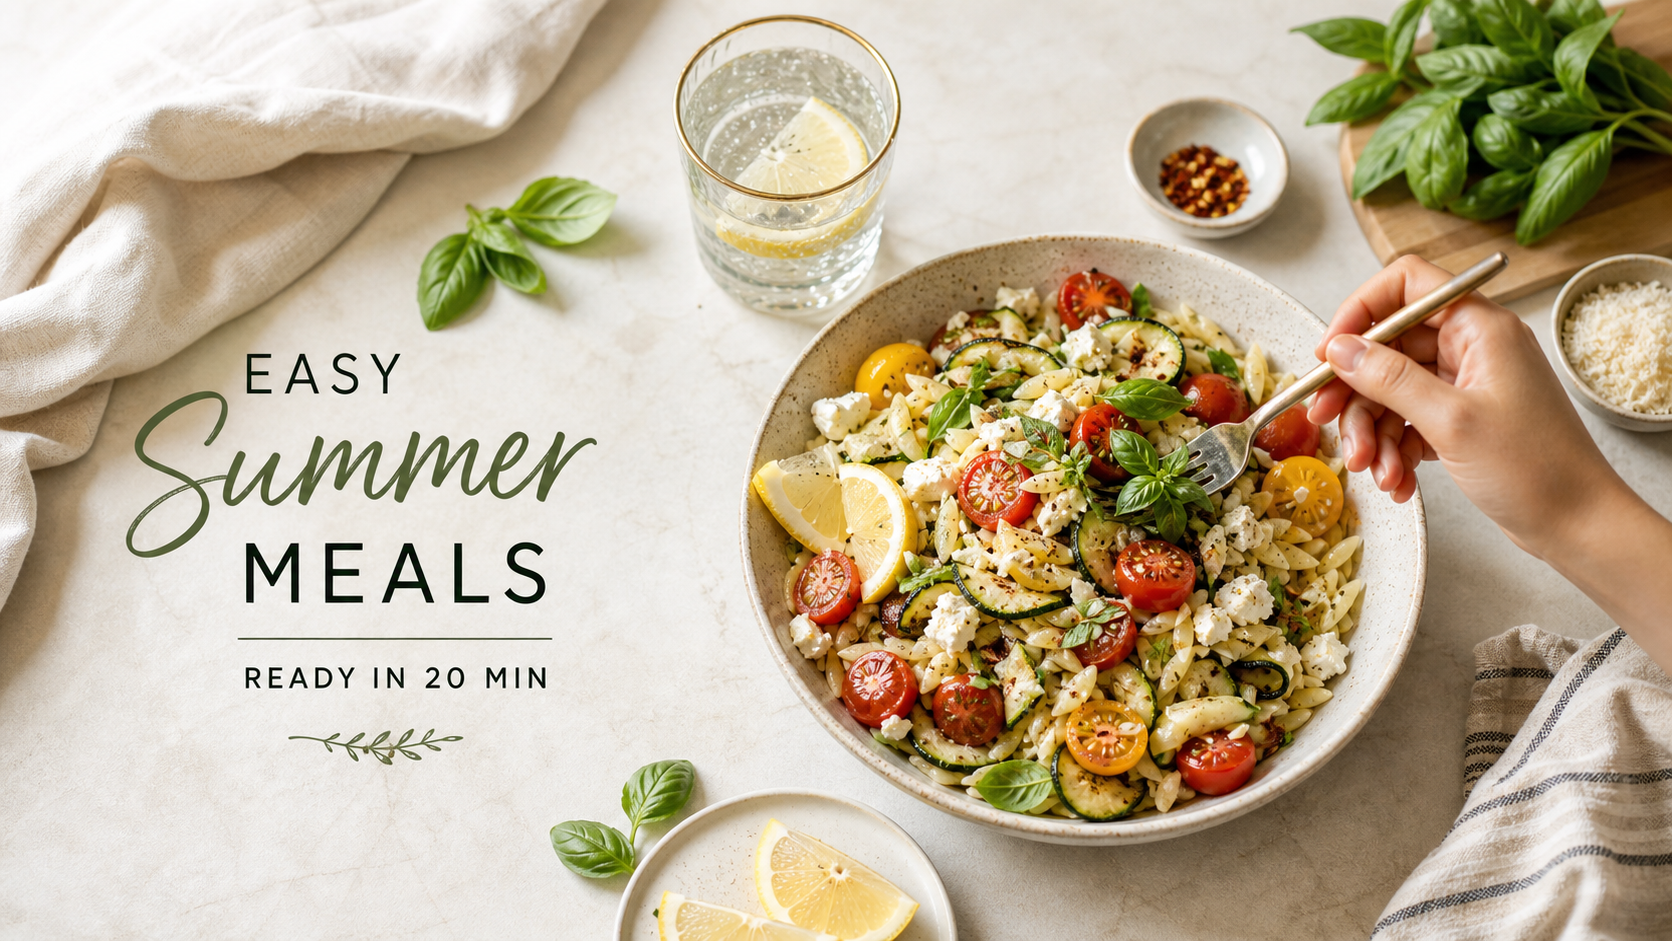
So, twenty minutes is my number. Not thirty, not forty-five, not “about an hour if everything goes smoothly,” which in my house it never does. Twenty minutes is the window between walking in the door after a long day and the moment my kids start foraging through the pantry like raccoons. At the same time, Tyler declares there’s “nothing to eat” standing directly in front of a fully stocked refrigerator. We’ve all been there, you know?
Here’s the thing I’ve figured out after fifteen years of cooking professionally and eight years of cooking for two children with strong opinions and zero patience—twenty minutes is actually enough time to make something genuinely great and not compromised. Not sad. Not the kind of dinner where everyone eats it without saying anything and then asks for cereal afterward. Real, satisfying, summer-beautiful food that tastes as if you cared about it because you did, even if you only had twenty minutes to show it.
Last July was when I really committed to this. We’d had one of those weeks—the catering job ran long, Marisol’s art camp had a showcase, and Tyler’s baseball team made the district playoffs somehow—and I realized we’d eaten takeout four nights in a row, not because I couldn’t cook but because I’d convinced myself I didn’t have enough time. I stood in my kitchen on a Friday night, looked at what was in the fridge, set a twenty-minute timer, and made something that my husband called “the best thing you’ve made all summer.” I’ve been living by the twenty-minute rule ever since.
Summer is on your side here — that’s the part people forget. The produce is extraordinary right now. The tomatoes, the corn, the fresh herbs, the stone fruit — everything is so good that it barely needs cooking. The heat does the flavor work for you. Your job is to get it on the table before anyone loses patience, you know?
These five recipes are genuinely done in twenty minutes. I’ve timed them. On school-night-level energy. With kids asking me questions in the background. If I can do it, you absolutely can too. Let’s go.
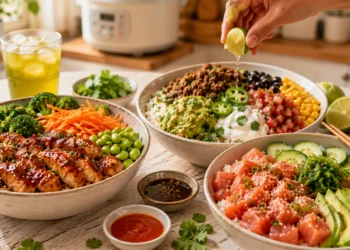
Meal 01 — Garlic Butter Shrimp & Corn Skillet
Time: 18 minutes | Serves: 4 | Effort: Easy
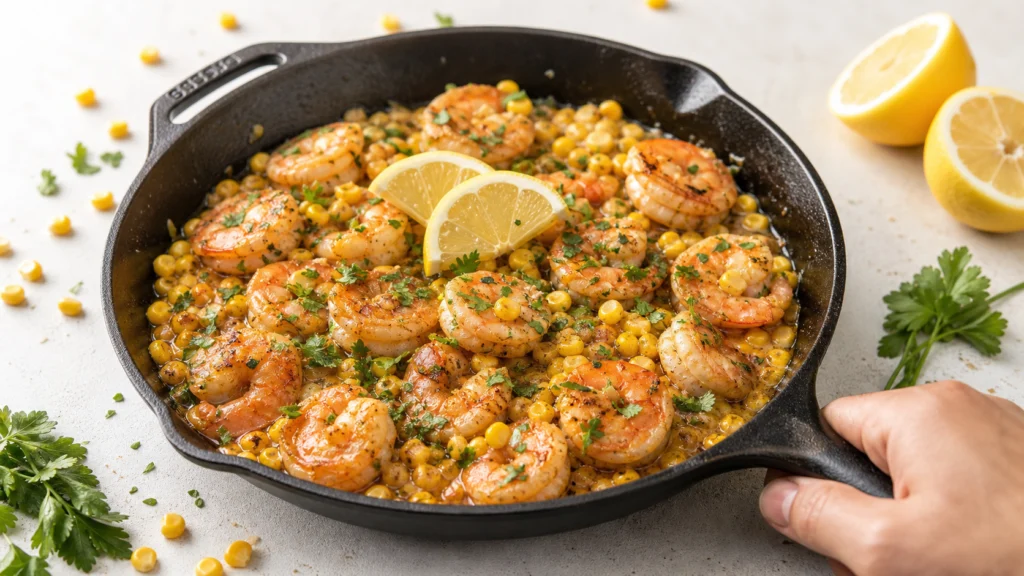
So this is the meal that started the whole twenty-minute summer project for me. It was a Thursday in late July; I had a bag of frozen shrimp in the freezer, three ears of corn on the counter from the farmers’ market, and a stick of butter that was about to become the hero of the evening. I had it on the table in under twenty minutes, and my husband walked in mid-cook, smelled the garlic-butter situation happening in that pan, and said, “Oh, we’re eating good tonight.” And we were. We really were, you know?
Here’s the thing about garlic butter—it is genuinely one of the most powerful flavor combinations in existence, and I say that as someone who has worked in professional kitchens where we made things significantly more complicated than garlic butter. But good butter, good garlic, fresh herbs, and the right heat level create something that smells and tastes incredible, making everyone in the vicinity of your kitchen wander over to see what’s happening—every single time.
I’ll be real with you—the corn is the unexpected star of this dish. Fresh summer corn, cut right off the cob and cooked in garlic butter for about 4 minutes, gets sweet and slightly caramelized, picking up all that flavor from the shrimp cooking in the same pan. It becomes something so much better than corn has any right to be in a twenty-minute weeknight dinner, you know?
Marisol asked me why we don’t have this every week, and I told her we basically do for two months every summer, and she said “good” with the energy of someone making a very important life decision. That child knows what she wants.
Ingredients
- 1½ lbs large shrimp, peeled and deveined (frozen is completely fine — thaw in cold water for 10 minutes)
- 4 ears fresh corn, kernels cut off (about 2½ cups—frozen corn works in a real pinch)
- 4 tbsp unsalted butter, divided (real butter, please — this is the whole point)
- 5 cloves garlic, minced (yes, five — don’t be nervous)
- ¼ cup dry white wine or chicken broth (the wine makes it a little more special)
- 1 lemon, zested and juiced
- ¼ cup fresh parsley, roughly chopped
- ½ tsp red pepper flakes (optional — I do a pinch for the kids, more for the adults)
- Salt and black pepper
- Crusty bread or rice to serve (the bread situation here is non-negotiable)
Instructions
Step 1. Pat your shrimp dry—completely dry, with paper towels. No shortcuts here because of wet steam instead of steam, and you’ll end up with that rubbery texture nobody wants. Season generously with salt, pepper, and lemon zest now, then set aside. Cut your corn off the cob while the pan heats up—stand the ear upright in a wide bowl and cut downward. The bowl catches all the kernels and the milky corn liquid that comes with them, and that liquid goes in the pan too, you know?
Step 2. Heat 2 tablespoons of butter in your largest skillet over medium-high until it foams and the foam subsides—that’s the moment it’s ready. Add the corn kernels, season with salt, and cook, stirring occasionally, for 4 minutes until the corn is slightly golden and smells sweet and nutty. Move the corn to the edges of the pan.
Step 3. Add the remaining butter to the center of the pan. Once melted, add garlic and cook for 30 seconds — just until fragrant, not brown. Add shrimp in a single layer right in the center. Cook 90 seconds per side. They should be pink, curled into a loose C, and just barely cooked through. Pull them the second that happens—shrimp go from perfect to rubbery in about 45 seconds, and there’s no coming back from that, you know?
Step 4. Pour in the white wine or broth and scrape up any golden bits from the bottom of the pan. That’s pure flavor, and you want every bit of it. Let it bubble for 1 minute, then squeeze in the lemon juice and toss everything together—corn, shrimp, all that—into a very garlicky, glossy, absolutely gorgeous sauce.
Step 5. Scatter the parsley over everything and hit it with red pepper flakes if you’re using them. Serve straight from the pan—get the bread to the table at the same time because that sauce is the whole point, and you need something to soak it up. This is peak summer in a skillet, and it took you eighteen minutes. You’re welcome.
Chef’s Notes & Family Verdict
Tyler ate directly from the pan with a piece of bread before I could even plate it, which is technically bad manners but also the sincerest form of compliment I can offer as a cook. I let it go. Some battles aren’t worth it.
Marisol ate two full servings and used her bread to wipe her bowl completely clean, which she does only for her absolute favorite things. I logged it mentally.
The sauce in the bottom of the pan is something you need to protect. Get there first with your bread before other people figure out what’s happening. I say this as a mother who loves her children and also will absolutely eat the good sauce before sharing it. You understand.
Variations I’ve Tested
Add a handful of halved cherry tomatoes with the corn—they burst in the heat and add sweetness and acidity that makes the whole dish even more summer-appropriate. Swap the shrimp for sea scallops, seared 2 minutes per side, for a more elegant version that still clocks in under twenty minutes. For a full one-pan meal, add a couple handfuls of baby spinach at the very end and toss until wilted — it disappears into the dish and adds nutrition without changing the flavor in any meaningful way.
Meal 02 — Greek Turkey Meatballs with Tzatziki & Warm Pita
Time: 20 minutes | Serves: 4 | Effort: Medium
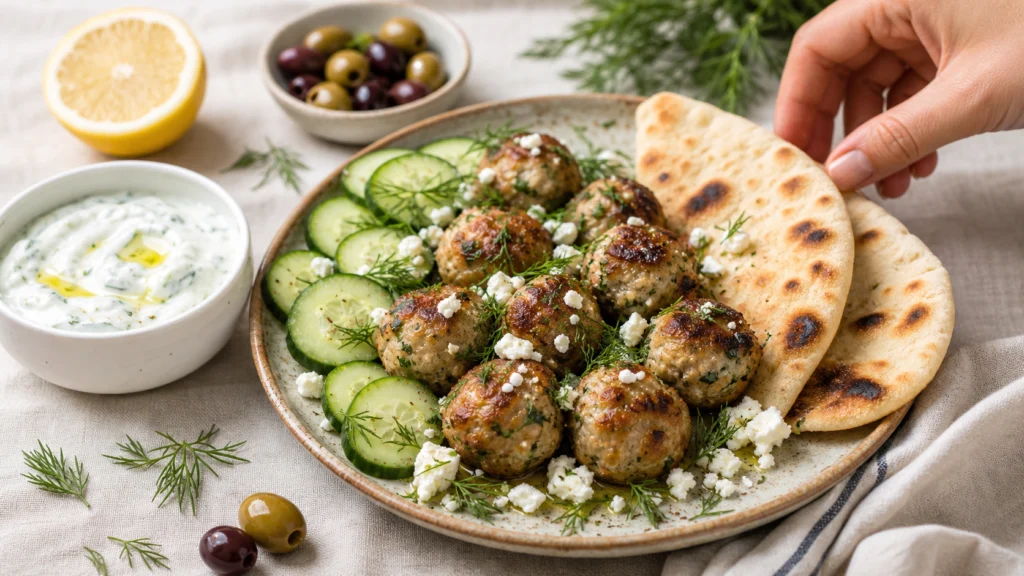
Now this is the one that looks the most impressive for the time it takes, and I’ve never once told anyone how fast it comes together because the reactions are too good and I’m only human, you know? A platter of herby turkey meatballs with homemade-ish tzatziki and warm pita looks like a dinner situation. It looks like you planned. It looks like a Saturday meal that somehow landed on a Tuesday. I’ll keep the twenty-minute secret between us.
Here’s the thing about turkey meatballs—ground turkey gets a bad reputation because people cook it without enough fat and flavor and end up with something dry and disappointing, and then blame the turkey when really they should blame the recipe. The secret is that each herb is non-negotiable; a little feta crumbled into the mixture adds fat and saltiness and holds moisture, and you cook them in enough olive oil so they get genuinely golden on the outside. That crust is everything, you know?
I developed this recipe specifically because my family will eat meatballs in any form, on any night, in any mood. It’s the one dinner where I get zero resistance from anyone at the table, regardless of how tired or difficult the day has been. Every parent needs at least one of those recipes in their back pocket. This is mine for the summer.
Ingredients
- 1 lb ground turkey (93% lean — don’t go leaner or they’ll dry out)
- ⅓ cup crumbled feta cheese
- 3 cloves garlic, minced and divided
- 2 tbsp fresh dill, chopped
- 2 tbsp fresh mint, chopped
- 1 tbsp fresh oregano or 1 tsp dried
- 1 egg
- ¼ cup breadcrumbs (panko if you have it)
- Salt and black pepper
- 2 tbsp olive oil for cooking
For the quick tzatziki:
- 1 cup full-fat Greek yogurt
- ½ English cucumber, grated and squeezed very dry
- 1 tbsp fresh dill
- 1 tbsp lemon juice
- 1 clove garlic, grated
- Salt and pepper
To serve:
- 4 warm pita breads
- Sliced cucumber and tomato
- Fresh lemon wedges
Instructions
Step 1. Make your tzatziki first, so it has a few minutes to sit, and the flavors can come together. Grate your cucumber on a box grater, then wrap it in a clean kitchen towel or several layers of paper towels and squeeze out as much liquid as you can—really wring it; you want it genuinely dry. A wet cucumber makes watery tzatziki, and watery tzatziki makes everyone sad. Mix it with yogurt, dill, lemon juice, garlic, salt, and pepper. Taste it and adjust. Set it in the fridge while you make the meatballs.
Step 2. Combine ground turkey, feta, two-thirds of the minced garlic, dill, mint, oregano, egg, breadcrumbs, salt, and a generous amount of black pepper in a bowl. Mix with your hands until just combined — don’t overwork it or the meatballs will be dense and tough. This is a gentle situation, you know? Roll into balls about the size of a golf ball. You should get about sixteen to eighteen meatballs.
Step 3. Heat olive oil in a large skillet over medium-high heat until shimmering. Add the meatballs in a single layer—don’t crowd them. Work in two batches if your pan isn’t big enough. Cook without moving for 3 minutes until a deep golden crust forms on the bottom. This crust is the difference between good meatballs and great ones. Flip and cook another 3 to 4 minutes, turning to brown all sides. Internal temperature should reach 165°F.
Step 4. While the meatballs finish cooking, warm your pita—30 seconds per side directly over a gas flame or 45 seconds in a dry skillet. Warm pita is a completely different experience from cold pita, and it takes one minute and makes everyone happier. Please warm the pita.
Step 5. Arrange everything on a big platter family-style—meatballs in the center, tzatziki in a bowl alongside, warm pita folded nearby, and sliced cucumber and tomato scattered around. Lemon wedges for squeezing. This is dinner, and it is genuinely beautiful on the table, and it took you twenty minutes. Take the compliments. You earned them.
Chef’s Notes & Family Verdict
Tyler puts four meatballs in a pita with tzatziki and eats it like a gyro, which is frankly inspired, and I’ve started doing the same. Marisol lines her meatballs up in a row before eating them, which is a whole thing, but she eats every single one, so I’ve learned to let the process be whatever it needs to be.
The leftover meatballs are genuinely excellent the next day in a grain bowl with quinoa, chopped cucumber, roasted red peppers, and extra tzatziki. I’ve been known to eat them cold, straight from the container, standing at the refrigerator, which I mention because I want you to know they’re that good and because honest food writing matters to me.
Variations I’ve Tested
Use ground chicken or ground lamb instead of turkey—the lamb version is absolutely extraordinary and feels more traditionally Greek if you want to go that direction. Add a cup of finely chopped baby spinach to the meatball mixture for extra nutrition. Blend the cheese until completely incorporated with the herbs and feta. The tzatziki works as a dip for vegetables all week—make double and keep it in the fridge for snacking situations because it genuinely gets better on day two.
Meal 03 — Sesame Ginger Noodles with Crispy Tofu & Snap Peas
Time: 20 minutes | Serves: 4 | Effort: Medium
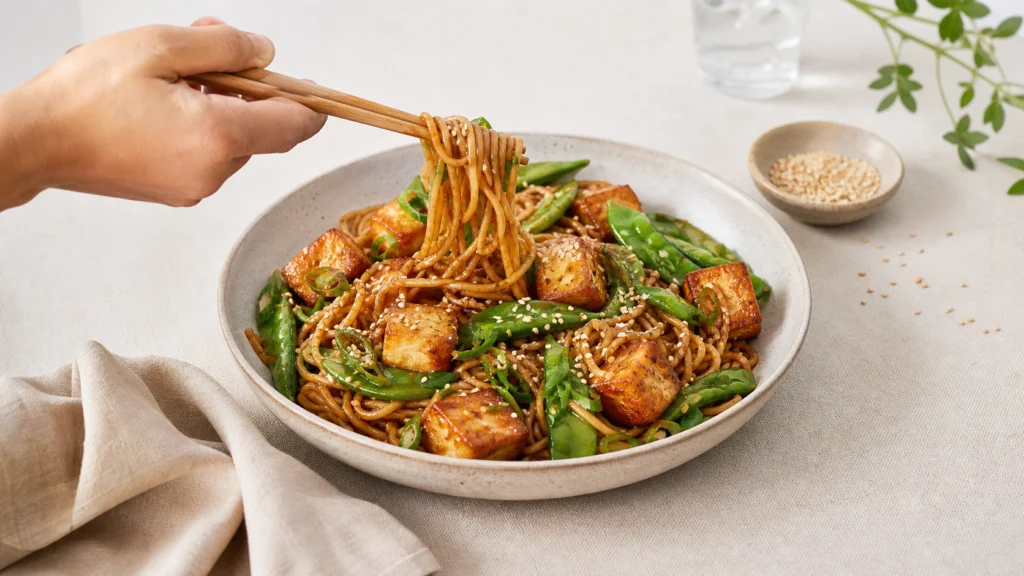
So here’s the recipe that converted my deeply skeptical household to tofu, and I want to be very clear that I didn’t tell anyone what they were eating until after they’d all said they liked it. I know some people consider this deceptive. I consider it an effective parenting and good cooking strategy. Tyler said, “What’s that crispy thing?” and I said, “Protein,” and he said, “Okay,” and ate his entire bowl. We don’t need to overthink this, you know?
Here’s the thing about tofu—crispy tofu is an entirely different food from soft tofu, in the same way that a raw potato and a French fry are technically the same ingredient but produce completely different emotional responses. The secret is pressing it, cutting it into small pieces, cooking it in enough hot oil, and not touching it until it’s actually ready to release from the pan. Five minutes of patience and you get these incredible golden, crispy cubes that absorb the sesame ginger sauce in a way that is honestly one of the best textural experiences in weeknight cooking.
I’ll be real with you — this is my favorite meal to make when I want something vegetarian that doesn’t feel like a compromise. It’s bold and salty and a little spicy, and the snap peas add this pop of freshness and crunch that balances everything out. My whole family eats it without complaint and often without realizing there’s no meat in it, which at this point I’ve decided is a feature rather than something I need to disclose upfront, you know?
Ingredients
- 14 oz extra-firm tofu (pressed for at least 15 minutes — do this first thing)
- 12 oz thin rice noodles or soba noodles
- 2 cups snap peas, strings removed
- 3 tbsp neutral oil for the tofu (vegetable or avocado)
- 3 green onions, sliced
- 2 tbsp sesame seeds, toasted
- Fresh cilantro to finish
For the sesame ginger sauce:
- 3 tbsp soy sauce or tamari
- 2 tbsp sesame oil
- 2 tbsp rice vinegar
- 1 tbsp honey or maple syrup
- 1 tbsp fresh ginger, grated
- 2 cloves garlic, grated
- 1–2 tsp chili garlic sauce or sriracha
- 2 tbsp warm water (to thin if needed)
- 1 tbsp peanut butter (optional — adds body and a subtle richness)
Instructions
Step 1. The moment you decide you’re making this dinner, press your tofu. Slice the block in half horizontally, wrap it in a clean kitchen towel, and put something heavy on top—a cast-iron pan, a stack of books, whatever you have. Set a timer for 15 minutes and do something else. Pressed tofu actually releases enough moisture to get crispy. Unpressed tofu steams instead of sears. This is the whole game, you know?
Step 2. While the tofu presses, make your sauce: whisk together soy sauce, sesame oil, rice vinegar, honey, ginger, garlic, and chili sauce until smooth. Add peanut butter, if using, and whisk until dissolved. Thin with warm water if it’s too thick. Taste it—you’re looking for a balance of salty, sweet, tangy, and spicy that makes you want to keep tasting it. Adjust from there. Set aside.
Step 3. Cook your noodles according to package directions while you work on the tofu—most thin rice noodles take 4 to 5 minutes. Drain them and rinse immediately under cold water to stop cooking. Toss with just a drop of sesame oil to prevent sticking.
Step 4. Cut your pressed tofu into ¾-inch cubes. Heat neutral oil in a large nonstick skillet over medium-high heat until shimmering. Add tofu in a single layer, and here is the critical instruction: do not touch it for 4 full minutes. I know it feels wrong. Do it anyway. When it releases easily and has a genuine golden crust, flip each piece. Another 3 to 4 minutes on the other side. That’s crispy tofu. Season lightly with salt.
Step 5. Add snap peas to the same pan and toss for 90 seconds—just until bright green, barely tender, and still snappy. Add the noodles and pour the sauce over everything. Toss well over the heat for about a minute until everything is coated, heated through, and smells absolutely incredible. Divide into bowls and top with green onions, sesame seeds, and fresh cilantro. Dinner is done, and it is seriously good.
Chef’s Notes & Family Verdict
Tyler ate this and asked what the “crispy things” were three times throughout the meal. I said “protein” three separate times. He nodded, apparently satisfied with this answer, and cleaned his bowl. Marisol ate around the snap peas initially and then came back for them, which I have learned is her process, and I no longer comment on it.
This is one of the best lunch leftovers in my rotation—the noodles absorb the sauce overnight, and the whole thing gets even more flavorful the next day. Add a little splash of soy sauce and a drop of sesame oil when you reheat it to wake it back up. I sometimes eat this cold right out of the containers, and I feel great about it.
Variations I’ve Tested
Use the same sauce on udon noodles for a chewier, heartier version that feels more substantial on cooler summer eves. Replace the tofu with shrimp or thinly sliced chicken breast if you need meat at the table—cook the protein the same way, in hot oil without touching it, and it works beautifully. Edamame instead of snap peas is a great swap when snap peas aren’t looking their best at the grocery store—it adds protein and that same bright green energy to the bowl.
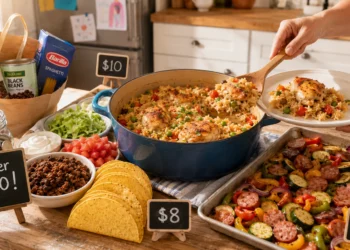
Meal 04 — Smashed Chickpea & Avocado Flatbreads
Time: 15 minutes | Serves: 4 | Effort: Super Easy
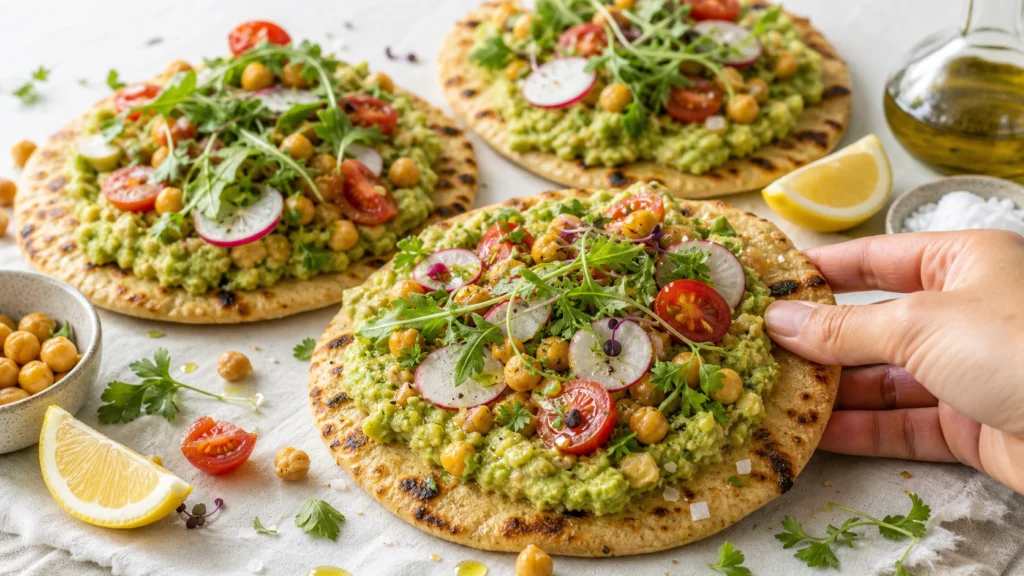
Now, this is the recipe I make when it is genuinely too hot to cook anything, and I need dinner to happen with minimal effort and zero oven involvement, you know? Smashed chickpeas. Avocado. Good flatbread. The most generous pile of fresh toppings you can manage. Done in fifteen minutes and somehow satisfying in a way that makes you forget you barely cooked anything at all.
Here’s the thing—smashed chickpeas are one of those ingredients that, to me, cooks don’t use enough, and I want to change that because they’re fast, cheap, filling, and, when you season them properly, truly interesting. I add lemon, garlic, cumin, and a good drizzle of olive oil, and suddenly a can of chickpeas becomes something you actually want to eat rather than something you bought with good intentions and left in the pantry for six months. We’ve all been there, you know?
This recipe came into my life during a three-day heat wave two summers ago, when the idea of turning on the stove felt genuinely offensive. I threw it together on the first night out of desperation, and by the third night, Tyler was specifically requesting it. That’s the kind of turnaround that makes you feel like a legitimate cooking genius even though—I’ll be real with you—the effort level here is somewhere between “actually cooking” and “elaborate snack.”
Ingredients
- 4 large flatbreads or naan (store-bought is completely fine here — get the good kind)
- 2 cans chickpeas, drained and rinsed (15 oz each)
- 2 ripe avocados
- 3 tbsp good olive oil, divided
- 3 cloves garlic, minced
- 1 tsp cumin
- ½ tsp smoked paprika
- Juice of 1 lemon, divided
- Salt and red pepper flakes
For the toppings:
- 1 cup cherry tomatoes, halved
- ½ English cucumber, diced small
- ¼ red onion, very thinly sliced
- ¼ cup fresh parsley or mint, roughly chopped
- 2 tbsp olive oil
- 1 tbsp red wine vinegar
- Salt and pepper
- Optional: crumbled feta, pickled red onions, a drizzle of tahini
Instructions
Step 1. Make your quick tomato topping first, so it has a few minutes to marinate. Toss cherry tomatoes, diced cucumber, and red onion with olive oil, red wine vinegar, salt, and pepper. Add the fresh parsley or mint, toss again, and set aside. Even five minutes of sitting makes this mixture taste more cohesive and intentional—the vinegar softens the onion, and the tomatoes release a little juice that becomes a light dressing, you know?
Step 2. Heat 2 tablespoons of olive oil in a skillet over medium heat. Add the garlic and cook for 30 seconds until fragrant. Add the drained chickpeas, cumin, smoked paprika, salt, and red pepper flakes. Cook, stirring for about 3 minutes, until the chickpeas are heated through and beginning to turn golden in spots. Now use the back of a fork or a potato masher and smash about half of them — you want a mixture of whole chickpeas for texture and smashed ones for creaminess. Squeeze in half the lemon juice, toss, taste, and adjust seasoning. This should be bold and well-seasoned because it’s carrying the whole flatbread, you know?
Step 3. Mash your avocado in a separate bowl with the remaining lemon juice, a pinch of salt, and a few red pepper flakes if you like heat. Keep it fairly chunky—this isn’t guacamole; you want texture and character. Taste it and add more salt or lemon until it makes you happy.
Step 4. Warm your flatbreads directly over a gas flame for about 20 seconds per side until slightly charred and puffed, or in a dry skillet for 30 seconds per side. Warm flatbread is dramatically better than cold flatbread, and I cannot stress this enough. It takes ninety seconds. Do it.
Step 5. Build each flatbread: a generous layer of mashed avocado spread to the edges, a big scoop of the smashed chickpeas on top, and then a pile of that tomato-cucumber topping over everything. Feta, pickled onions, and a tahini drizzle, if you’re going for it. Eat it immediately while the flatbread is still warm, and everything is fresh, bright, and perfect. Ttwass is an ummer dinner, and it took 15 minutes. It was seriously amazing.
Chef’s Notes & Family Verdict
Marisol eats hers open-faced with a fork and knife—very formal, very deliberate, very Marisol. She picked out every piece of red onion the first time, and I added pickled onions instead in subsequent versions, which she prefers because, apparently, the pickling makes them “less sharp.” The girl has opinions, and I respect them.
Tyler folds his flatbread in half like a sandwich and eats it in about four bites with complete commitment. He said it “tastes like something from that Mediterranean place”—referring to a restaurant we all love—and that was enough for me.
This is the kind of dinner that gets better the more toppings you pile on, so I always set out a full spread and let everyone build their own. Customizable dinners mean no complaints about what’s in them, which is a strategy I’ve been refining for years, and it genuinely works, you know?
Variations I’ve Tested
Add a fried egg on top—a runny-yolked fried egg over the smashed chickpeas turns this from a light dinner into something more substantial that really satisfies even on hungry nights. Swap the flatbread for toasted sourdough for a smashed chickpea toast situation that makes an incredible lunch. A spoonful of harissa stirred into the chickpeas adds a North African warmth and complexity, taking this in a completely different, more exciting direction—highly recommended for the adults at the table.
Meal 05 — Lemon Herb Cod with Quick Summer Succotash
Time: 20 minutes | Serves: 4 | Effort: Medium
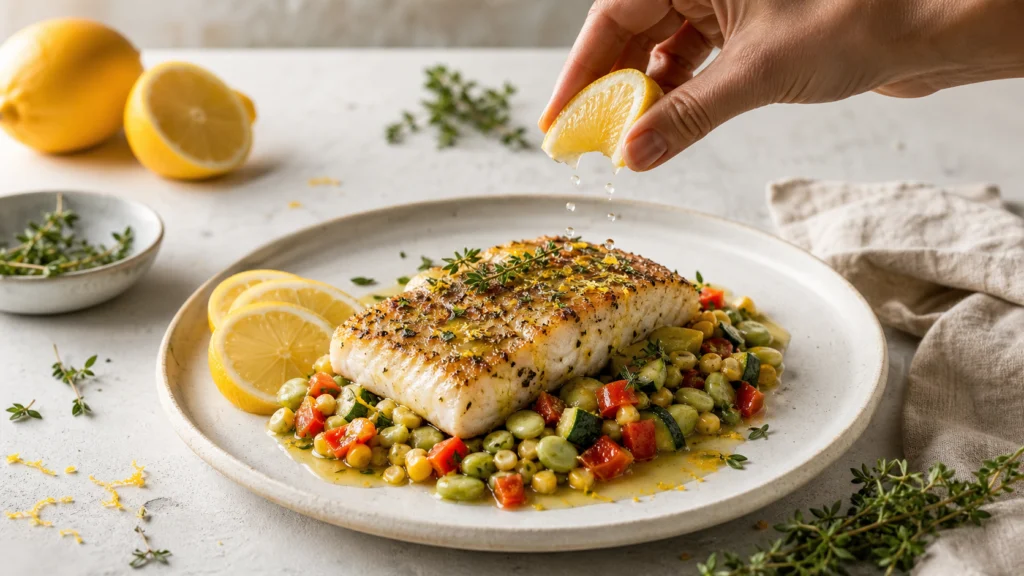
So I want to close with the recipe that feels most like summer to me—proper summer, the kind with a soundtrack, smells like sunscreen, and has something beautiful cooking on the stove. Lemon herb cod is everything I love about summer cooking: light, bright, fast, and flexible in a way that lets the ingredients do the heavy lifting while you’re standing at the stove for exactly twenty minutes, you know?
Here’s the thing about cod: it’s underrated, it’s affordable compared to almost every other fish, and it cooks beautifully fast in a pan because the fillets aren’t thick. Good olive oil, lemon, fresh herbs, four minutes per side, and it’s done. That’s the whole technique, and it produces something that flakes perfectly, tastes clean and delicate, and is exactly the right thing to eat in summer.
I’ll be real with you—succotash sounds old-fashioned, and I understand the skepticism because I had it too. But a quick summer succotash made with fresh corn, zucchini, cherry tomatoes, and a little bacon is genuinely one of the best summer side dishes in existence, and it comes together in the same pan while the fish rests. The whole thing takes twenty minutes, and it is exactly the kind of dinner that makes you feel like summer is being used to its fullest.
My husband makes this face when I put this in front of him—this involuntary closed-eye appreciative face—and I have been cooking professionally for fifteen years, and I still live for that face. You’re going to get that face, too. I promise you.
Ingredients
- 4 cod fillets, about 6 oz each (or halibut, sea bass, or any mild white fish)
- 2 tbsp olive oil
- 1 lemon, zested and cut into wedges
- 2 cloves garlic, minced
- 2 tbsp fresh dill or tarragon, chopped
- Salt and cracked black pepper
For the quick succotash:
- 3 ears fresh corn, kernels cut off (or 2 cups frozen)
- 1 medium zucchini, diced small
- 1 cup cherry tomatoes, halved
- 3 slices bacon, diced (optional but wonderful—skip for a fully light version)
- 1 cup frozen or fresh edamame or lima beans, thawed
- 2 cloves garlic, minced
- 1 tbsp butter
- Fresh basil to finish
- Salt, pepper, and a squeeze of lemon
Instructions
Step 1. Season your cod fillets on both sides with salt, pepper, and lemon zest. Set aside for 5 minutes while you prep the succotash ingredients—room-temperature fish cooks more evenly than cold fish straight from the fridge, and those five minutes make a real difference in how the center cooks, you know?
Step 2. Start your succotash. If you’re using bacon, cook it in a large skillet over medium heat until crispy, then remove it to a paper towel and leave about a tablespoon of the fat in the pan. If you’re skipping the bacon, add a tablespoon of olive oil instead. Add the zucchini and corn to the pan, season with salt, and cook, stirring occasionally, for 4 minutes until the vegetables start to color at the edges. Add garlic for another 30 seconds. Add cherry tomatoes and edamame, toss to combine, and cook for 2 more minutes until the tomatoes are just starting to soften. Keep warm over low heat.
Step 3. In a separate skillet, heat olive oil over medium-high until shimmering. Add the cod fillets and cook without touching for 4 minutes—a proper golden crust on the bottom is what you’re building, and it won’t happen if you keep lifting the fish to check on it, you know? Flip carefully with a wide spatula. Cook 3 to 4 more minutes on the second side. The fish is done when it flakes easily at the thickest part and is opaque throughout. Squeeze a little lemon juice over the top as soon as it comes out of the pan.
Step 4. Finish the succotash—stir in the butter, torn fresh basil, a squeeze of lemon, and the reserved bacon if you used it. Taste and adjust salt. The butter at the end adds richness, makes everything glossy and gorgeous, and is the difference between a side dish and one you want to eat directly out of the pan, you know?
Step 5. Serve the cod over or alongside a generous pile of that warm succotash. Fresh dill or tarragon scattered over the fish. Lemon wedges for squeezing at the table. This is summer dinner at its very best—light and bright and fresh and completely satisfying without being heavy. Twenty minutes. Real food. Everyone is happy. That’s the whole goal.
Chef’s Notes & Family Verdict
Tyler said this was “actually really good for fish,” which, from a twelve-year-old who has historically described all fish as “too fishy,” is an extraordinary compliment, and I received it as such. He ate the whole fillet and went back for extra succotash, which was the real victory.
Marisol ate everything except the bacon pieces, which she carefully relocated to the edge of her plate, then asked me why I put “meat candy” in the corn. I didn’t have a great answer. The bacon stays in because the rest of us love it, and she eats around it peacefully, so everyone wins.
The succotash is genuinely excellent the next day, tossed with cooked pasta, a little extra olive oil, and fresh Parmesan for a completely different meal that uses up leftovers beautifully. I’ve done it multiple times, and it never disappoints.
Variations I’ve Tested
Swap the cod for shrimp—season them the same way with lemon zest and dill, and cook for 90 seconds per side—and serve them right on top of the succotash for a version that feels more casual and fun and is equally fast. Use the succotash as a base for fried eggs on weekend mornings when you have leftover vegetables—summer vegetable hash with a runny egg on top is one of the best things you can make with five minutes of effort, you know. Add a spoonful of pesto stirred into the succotash at the very end for a more intensely flavored, herb-forward version that makes the whole dish taste like summer in Italy, which is never a bad thing.
So here’s what I want you to remember after all of this—twenty minutes is enough. It has always been enough. The best summer cooking isn’t about elaborate recipes and long afternoons in the kitchen. It’s about good ingredients, a hot pan, and the confidence to trust that simple things done well will always taste better than complicated things done under pressure. You have twenty minutes. You have everything you need. Now make dinner, you know?
Happy cooking, friends! — Chef Julia ✦ Chicago, IL


Discussion about this post