So I’ll paint you a picture. Last August, Dan decided we were going to do a family camping trip up in Wisconsin. Three nights, two kids, and one tent that took us forty-five minutes to set up in the dark because nobody had read the instructions beforehand. I’m standing at a campfire at seven in the evening; Jake is melting down because he’s hungry, Maya is asking if there’s WiFi, and I’m trying to cook pasta on a camp stove with one pot and absolutely no plan. It was, not gonna lie, a complete disaster. The pasta was gummy, the sauce came from a jar I’d thrown in the cooler at the last second, and nobody was happy, you know?
Here’s the thing I learned that trip—and I say this as someone who has cooked professionally for fifteen years—camping food doesn’t fail because people can’t cook. It fails because nobody prepped before they left the house. The campfire is not the place to figure out your meal plan. Your kitchen, the night before you leave, with your actual equipment and all your ingredients right in front of you—THAT is where camping meals get made. Everything else is just reheating, and reheating over a fire is genuinely one of life’s simple pleasures.
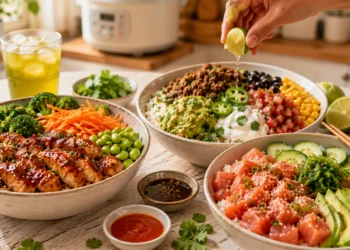
So I completely overhauled how our family camps and eats. Everything — and I mean everything — gets prepped, portioned, partially cooked, or fully cooked at home. These are the meals we actually make now, and they’ve turned camping dinners from a stressor into something the kids genuinely get excited about.
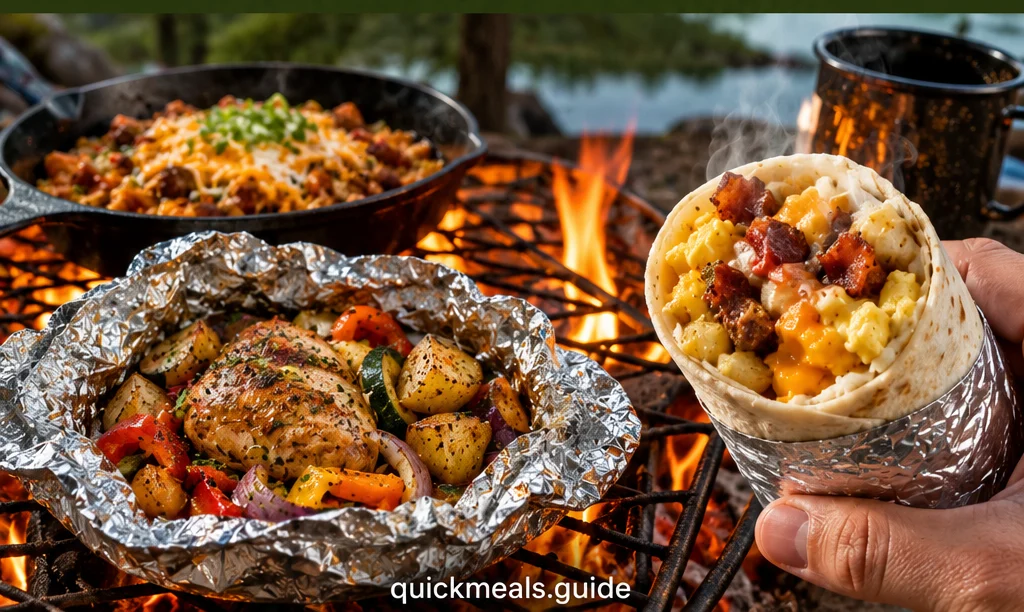
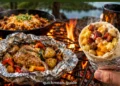
1. Make-Ahead Foil Packet Chicken & Vegetables
This one changed our camping life. I’m not being dramatic. Foil packets you assemble entirely at home, freeze flat, and throw directly onto the campfire coals — no camp stove, no pots, no cleanup beyond wadding up foil. OH MY GOSH, it’s so simple; I felt a little embarrassed that it took me this long to figure it out.
What you need: 4 boneless chicken thighs—thighs, not breasts; they hold up better over fire. 2 cups baby potatoes, halved 2 bell peppers, sliced 1 zucchini, sliced into half-moons 4 tablespoons of olive oil 4 cloves of garlic, minced 2 teaspoons of Italian seasoning 1 teaspoon of smoked paprika Salt and pepper Heavy-duty aluminum foil—don’t cheap out on the foil; regular foil will burn through
At home, before you leave, season the chicken thighs generously with Italian seasoning, smoked paprika, garlic salt, and pepper. Toss all the vegetables with olive oil, salt, and pepper in a big bowl. Tear off four large sheets of heavy-duty foil, double-layer them, and divide the vegetables between the four packets. Place one chicken thigh on top of each vegetable pile. Seal the packets tightly, folding the edges over at least twice—you want a good seal so the steam stays trapped inside. Lay them flat in a zip-lock bag or freezer-safe container and freeze until you leave.
At the campsite: Pull the frozen packets out of the cooler and place them directly onto the campfire coals or on a grate over the fire. Cook for about 30 to 35 minutes, flipping once halfway through with tongs. Let them rest for five minutes before opening—that steam is still cooking the food, and it’s also extremely hot, so warn the kids, you know?
Julia’s real tip: Label every packet with a marker before you freeze them. This sounds obvious, and I skipped it once and spent ten minutes at the campsite trying to remember which packet had the version without peppers that Jake would actually eat. Label your packets.
Family verdict: Jake calls these “fire bags” and requests them by that name. Maya eats every single vegetable without complaint, which at home would require a negotiation. Something about food cooked over a fire makes children reasonable. I’m not questioning it.
2. Pre-Made Breakfast Burritos
Now breakfast is the meal that really makes or breaks a camping trip. You wake up, you’re cold, the kids are immediately hungry, and if you don’t have something ready to go, you’re looking at a very long morning. These burritos get made at home, wrapped individually, frozen, and reheated directly on the camp grate or in a pan—five to eight minutes, and breakfast is done.
What you need (makes 8 burritos): 8 large flour tortillas, 10 large eggs, scrambled, 1 pound of breakfast sausage, cooked and crumbled, 1 cup of shredded cheddar cheese, 1 can of black beans, drained and rinsed, 1 cup of salsa, half a cup of sour cream, 1 red bell pepper, and half an onion, diced and sautéed; salt, pepper, garlic powder, and cumin
At home: Cook the sausage in a large skillet, crumble it, and set aside. Sauté the diced pepper and onion in the sausage drippings until soft. Scramble the eggs in the same pan — season well with salt, pepper, garlic powder, and a pinch of cumin. Let everything cool completely before assembling. This is important—warm filling makes soggy burritos, and that’s a sad way to start a camping morning.
Lay a tortilla flat; add a spoonful of beans down the center, then eggs, then the sausage and pepper mixture, then a generous pinch of cheese. Don’t overfill — this is the classic burrito mistake. Roll them tightly, wrap each one individually in foil, and freeze in a zip-lock bag.
At the campsite: Place the foil-wrapped burritos directly on the campfire grate over medium heat for about five to eight minutes, turning a couple of times. The outside gets a little toasted through the foil, the cheese melts, and everything comes together perfectly. Serve with the sour cream and salsa you’ve packed in small containers in your cooler.
Julia’s real tip: Make two batches. Seriously. You’ll eat them for breakfast on day one and wish you’d made more. I’ve never once returned from a camping trip with leftover breakfast burritos. Not once.
Family verdict: These are the type of camping foods both kids are equally excited about. Jake unwraps his with genuine ceremony. Maya adds hot sauce she’s been keeping in her backpack like a little spice smuggler, which I fully respect.
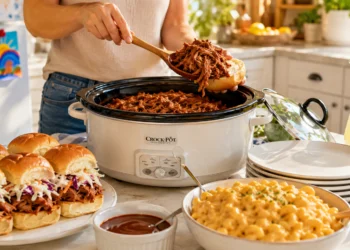
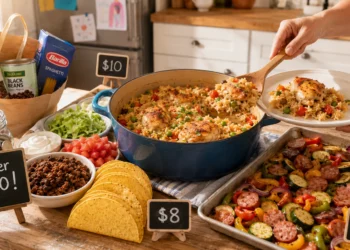
3. One-Pot Campfire Chili
Here’s the thing about chili—it’s one of those foods that was almost designed for camping. It’s a one-pot meal, it reheats beautifully, it actually tastes better the second day, and it feeds a crowd without any complicated technique. I make a full batch at home, let it cool, divide it into quart-size zip-lock bags, and freeze them flat. At the campsite, it goes straight into the pot, heats over the fire, and dinner is ready in under 20 minutes.
What you need: 1.5 pounds of ground beef or turkey 2 cans of kidney beans, drained 1 can of black beans, drained 1 large can of crushed tomatoes 1 can of diced tomatoes with green chiles 1 large onion, diced 4 cloves of garlic, minced 2 tablespoons of chili powder 1 tablespoon of cumin 1 teaspoon of smoked paprika Half a teaspoon of cayenne—adjust to your crowd. Salt and pepper, olive oil
At home: Heat a splash of olive oil in your largest pot, cook the onion until soft, add the garlic, then brown the ground meat well—don’t rush this step; good browning is where the flavor starts. Add all the spices, stir, and cook for one more minute. Add both cans of beans and both cans of tomatoes. Simmer uncovered for at least thirty minutes, stirring occasionally. Taste and adjust seasoning. Let it cool completely, then portion it into quart zip-lock bags—one bag per night you’ll need it—and freeze flat so they stack neatly in your freezer.
At the campsite: Drop the frozen chili block directly into your camp pot over the fire, add a small splash of water to help it get started, and heat through with stirring for about fifteen to twenty minutes. Serve with shredded cheese, sour cream, crackers, or cornbread you baked at home and sliced before you left.
Julia’s real tip: Pack your toppings in a small dedicated bag—a small container of sour cream, shredded cheese in a zip-lock, crackers, and maybe some sliced green onions. The toppings are what make campfire chili feel like an actual dinner instead of emergency food, you know?
Family verdict: This has become our official first-night camping dinner. Dan handles the fire; I handle getting the chili hot, and somehow it tastes better outside than it ever does at home. I genuinely don’t know if it’s the fire, the fresh air, or the fact that everyone is hungry enough not to be picky, but I’ll take it every single time.
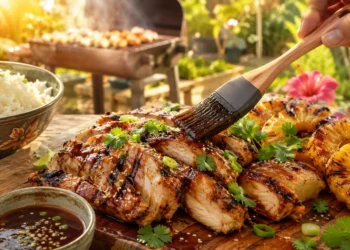
4. Marinated Grilled Sausages & Peppers
Now, this one requires almost no prep beyond the marinade you make at home, and it cooks fast enough at the campsite that even hungry, impatient kids can wait it out. Sausages, bell peppers, and onions were marinated together in a bag and cooked directly on the campfire grate. Simple, satisfying, and zero cleanup beyond the grate itself.
What you need: 6 to 8 Italian sausages—mild or hot, your call 3 bell peppers, sliced into strips 2 onions, sliced into half-moons 3 tablespoons of olive oil 3 tablespoons of balsamic vinegar 3 cloves of garlic, minced 1 tablespoon of Italian seasoning Salt and pepper Hoagie rolls or a crusty baguette you’ve wrapped in foil
At home: Poke the sausages a few times with a fork. Combine the olive oil, balsamic vinegar, garlic, Italian seasoning, salt, and pepper in a large zip-lock bag. Add the sausages, peppers, and onions, seal the bag, squish everything around until well coated, and refrigerate or freeze. That marinade has been working on the flavors the whole drive up, you know?
At the campsite: Lay the sausages directly on the grate over the fire, turning every few minutes until cooked through and nicely charred—about fifteen minutes total. Meanwhile, pile the peppers and onions into your camp pan or a foil packet and cook them alongside, stirring occasionally until soft and caramelized. Serve everything piled into the rolls.
Julia’s real tip: Warm the hoagie rolls right on the grate for the last two minutes—just until they’re lightly toasted. This takes the whole situation from a quick camp dinner to something that feels genuinely put together, and it costs you two minutes and zero extra effort.
Family verdict: Dan made these for the neighbors at our last camping trip, and someone referred to him as “a great cook.” I was standing right there. With fifteen years of professional cooking experience. Standing right there. He was very pleased with himself. I’ll allow it.
5. Pre-Cooked Pasta with Pesto & Cherry Tomatoes
So this one is specifically designed to fix the exact mistake I made on our very first camping trip with the gummy pasta disaster. The trick—and it’s so simple—is to cook the pasta fully at home, toss it with a little olive oil so it doesn’t stick together, and pack it cold in a zip-lock bag. At the campsite, all you’re doing is warming it through in a pan with the—nice—no boiling a huge pot of water over a camp stove. Don’t drain pasta in the dark. No drama.
What you need: 1 pound of rotini or penne—shapes that hold onto sauce Half a cup of good pesto—homemade if you have time; store-bought is completely fine. 1 cup of cherry tomatoes, halved Half a cup of parmesan, freshly grated Parmesaned in a small container 3 tablespoons of olive oil Salt and pepper Optional: a handful of toasted pine nuts packed in a small bag Optional: leftover grilled chicken, sliced thin, packed separately
At home: Cook the pasta until just al dente—don’t overcook it; it’ll soften a little more when you reheat it at the campsite. Drain it, rinse it briefly with cold water, toss it with a generous drizzle of olive oil so every piece is coated, and let it cool completely. Pack it flat in a large Ziploc bag. Pack the pesto separately in a small container, the cherry tomatoes in another bag, and the parmesan in its own little container. This sounds like a lot of bags, but the whole system fits into one corner of your cooler, you know?
At the campsite: Heat a couple of tablespoons of olive oil in your camp pan over the fire. Add the cold pasta and toss until it’s warmed through—about 5 minutes. Add the pesto and the cherry tomatoes, toss everything together until the tomatoes start to soften slightly and the pesto coats every piece. Season with salt and pepper, then finish with Parmesan and pine nuts.
Parmesan tip: This is the camping meal that always surprises people. They expect camp food to be rough and functional. When they see pasta with pesto, fresh tomatoes, and Parmesan made over a campfire, there’s this moment of genuine delight that I absolutely love. It’s still simple — the prep happened at home — but it looks and tastes like you put real thought into it. Because you did, just not at the campsite.
Family verdict: Maya declared this “actually restaurant quality” last summer, which, coming from a twelve-year-old who has developed strong opinions about food, is honestly my favorite review I’ve ever gotten. Jake picked out all the tomatoes and ate only the pasta with the Parmesan on top, which is the Parmesan he likes, and I’ve made my peace with it.
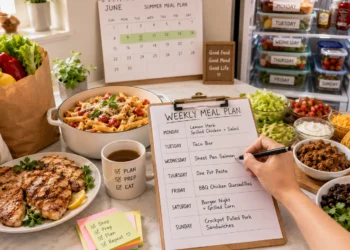
The Golden Rules of Pre-Made Camping Meals
So after a few years of figuring this out through trial, error, and one genuinely terrible camping dinner, here’s what I know for sure.
Cook and cool completely before packing. Hot food goes into zip-lock bags and then into a cooler, and you end up with food safety issues and soggy everything. Cool it first. Always.
Freeze what you can. Frozen meals act as their own ice packs in the cooler; they stay food-safe longer, and they give you flexibility on which night you eat what. I plan the frozen meals for nights two and three and the fresh meals for night one.
Label everything. Every bag, every container, every foil packet gets a label with what it is and which night it’s for. You will not remember. I promise you will not remember. Label everything, you know?
Pack a spice kit. A small zip-lock with little bags of salt, pepper, garlic powder, smoked paprika, and Italian seasoning takes up almost no space and fixes almost any flavor problem you encounter at the campsite. It’s the best thing I started doing and costs almost nothing.
One pot, one pan, one cutting board. That’s the whole kitchen. Everything I make at the campsite is designed around that constraint. If it needs more equipment than that to execute, it stays home.
Camping food doesn’t have to mean sad granola bars and canned beans eaten cold straight from the can—we’ve all been there, and it doesn’t have to be that way. A couple of hours in your real kitchen before you leave does more for a camping trip than any amount of camp cooking ever could. Prep it at home, reheat it over fire, eat it under the stars, and let everyone think you’re some outdoor culinary genius.
You’ve got this. Now enjoy your trip, you know?
— Chef Julia


Discussion about this post