So the oven ban in our house runs from roughly mid-June through late August, and I enforce it with real commitment. It’s not an official policy, more of a standing personal agreement I’ve made with myself after years of heating up a kitchen that was already hot, watching the air conditioning fight a losing battle against a 375-degree oven, and wondering why I was making things harder than they needed to be, you know?
Here’s the thing about no-bake desserts that I’ve come to understand and fully embrace — the constraint of not using the oven actually pushes you toward some of the most genuinely satisfying summer desserts there are. Desserts that are cold and refreshing rather than warm and heavy. Desserts that use peak summer fruit rather than cooked-down versions of it. Desserts that taste light even when they’re rich because the refrigerator and freezer do the setting work instead of heat. No-bake isn’t a lesser category. In summer, it’s often the better one, you know?
These ten no-bake desserts are the ones I make most often all summer — at cookouts, at weeknight dinners, for kids’ snacks that straddle the line into actual dessert territory, and for the occasions when I just want something sweet that didn’t require me to stand next to a hot oven for any amount of time. All of them use the refrigerator or freezer to set. None of them require baking. Several of them are better the day after you make them, which makes them perfect for planning ahead.
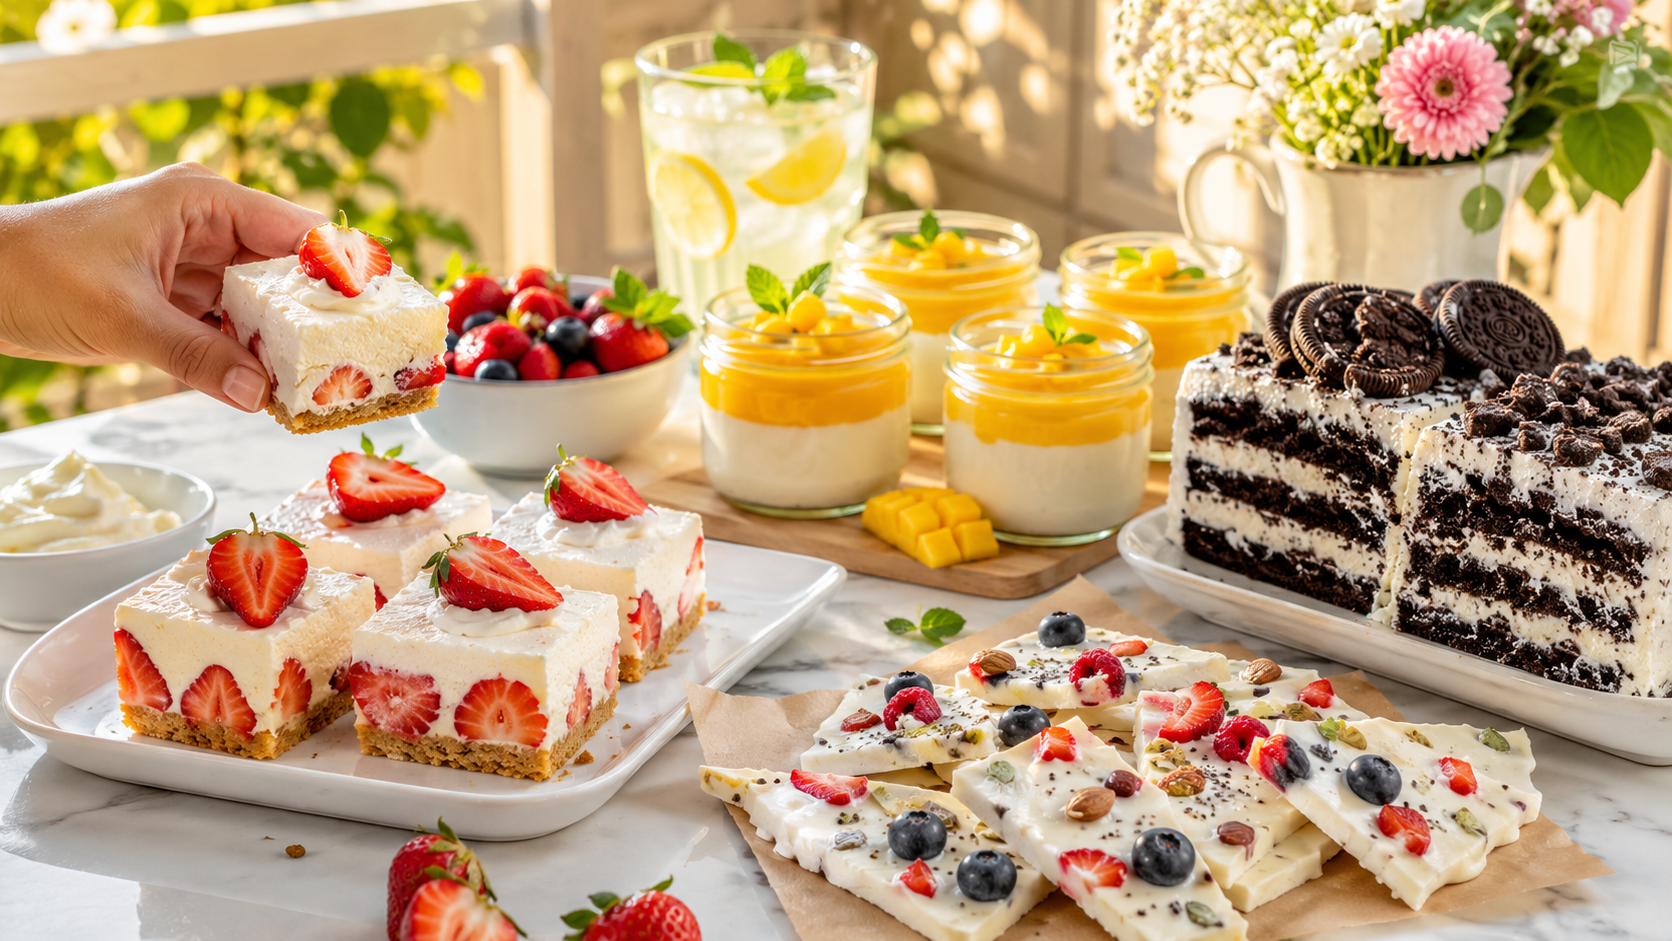
1. No-Churn Strawberry Ice Cream
So the no-churn ice cream technique — sweetened condensed milk folded into whipped cream — is one of the most useful dessert tricks I know, and the strawberry version is the one that gets made most often in our house because peak summer strawberries fold into this base and become something genuinely spectacular. Creamy, intensely strawberry-flavored, scoopable right out of the loaf pan, and it requires absolutely no special equipment, you know?
What you need (makes about 1 quart): 2 cups of fresh strawberries, hulled and roughly mashed with a fork — you want a chunky jam-like texture, not a smooth puree, so the ice cream has swirls and pieces of real fruit 3 tablespoons of sugar Juice of half a lemon 2 cups of heavy whipping cream, very cold One 14-ounce can of sweetened condensed milk 1 teaspoon of vanilla extract A tiny pinch of salt
Here’s how it goes: Combine the mashed strawberries with the sugar and lemon juice and let them sit for fifteen minutes until the sugar draws out the juice and everything becomes saucy and fragrant. This macerating step concentrates the strawberry flavor significantly and produces a much more vibrant result than fresh strawberries folded in without any pre-treatment, you know?
Whip the heavy cream to stiff peaks — three to four minutes on high with a hand mixer. In a separate large bowl, combine the sweetened condensed milk, vanilla, and salt. Fold the whipped cream into the condensed milk mixture in three additions using a light hand. Fold in the mashed strawberries with just two or three strokes — you want visible swirls of pink through the white cream, not a uniform pink color. Pour into a loaf pan, press plastic wrap directly onto the surface, and freeze for at least six hours.
Julia’s real tip: The plastic wrap directly on the surface is the step that prevents ice crystals on top. Don’t just cover the top of the pan — press the wrap down so it’s touching the ice cream surface completely. This is the detail that makes homemade no-churn ice cream look and texture like a proper ice cream rather than a frozen thing with an icy crust, you know?
Family verdict: OH MY GOSH, Jake’s rating system broke down the first time I served this. He just kept eating. Maya ate hers slowly and deliberately like someone committing a flavor to memory. Dan had two scoops and stood at the freezer contemplating a third before deciding against it, a decision he looked uncertain about.
2. Chocolate Mousse Cups
Here’s the no-bake dessert that feels most impressive for the effort involved — dark chocolate mousse that’s genuinely silky and rich, set in individual glasses, topped with fresh berries and a cloud of whipped cream. It looks like a restaurant dessert and takes about twenty minutes of actual work, then the fridge handles everything else, you know?
What you need (serves 6): 6 ounces of good dark chocolate, at least 70% cacao, finely chopped 3 large eggs, separated — room temperature A quarter cup of sugar 1 cup of heavy whipping cream, divided — half for the mousse, half for topping 1 teaspoon of vanilla extract A tiny pinch of salt Fresh raspberries or strawberries to top
Here’s how it goes: Melt the chocolate in a bowl set over simmering water, stirring until completely smooth. Remove from heat and cool for five minutes — it should feel warm but not hot when you touch the bottom of the bowl.
Whisk the egg yolks with two tablespoons of the sugar until slightly thickened and pale. Whisk into the cooled chocolate. In a clean bowl, whip half a cup of the cream to soft peaks and fold gently into the chocolate mixture. Beat the egg whites with the remaining two tablespoons of sugar and the pinch of salt to stiff glossy peaks. Fold the egg whites into the chocolate cream in three additions — this is the step that creates the mousse’s airy, light texture, so fold gently and stop as soon as the whites are incorporated.
Divide among six glasses. Refrigerate for at least three hours, ideally overnight. Before serving, whip the remaining cream to soft peaks, dollop over each glass, and top with fresh berries.
Julia’s real tip: Fold the egg whites in three additions rather than all at once — this is the technique that keeps as much air in the mousse as possible. Each addition lightens the chocolate base slightly before the next addition goes in, and the result is noticeably airier and more delicate than mousse where the whites were folded in all at once.
Family verdict: Maya considers this the most sophisticated dessert in my repertoire and requests it for dinner parties and her own birthday. Dan ate his in what I’d describe as focused appreciation. Jake’s primary concern was the ratio of mousse to whipped cream to berries, which he adjusted aggressively in favor of whipped cream.
3. Strawberry Icebox Cake
So here’s the classic no-bake cake that requires literally zero cooking skill — layers of whipped cream and graham crackers, refrigerated overnight until the crackers soften into something that tastes exactly like a tender vanilla cake layer. Topped with fresh strawberries and more whipped cream, it’s genuinely one of the most crowd-pleasing summer desserts I know, and it feeds a big group from one pan, you know?
What you need (serves 10 to 12): 2 and a half cups of heavy whipping cream 3 tablespoons of powdered sugar 1 teaspoon of vanilla extract One full box of honey graham crackers 2 pounds of fresh strawberries, hulled and sliced 2 tablespoons of sugar for macerating the strawberries
Here’s how it goes: Toss the sliced strawberries with the two tablespoons of sugar and let them sit for twenty minutes to macerate. Whip the heavy cream with the powdered sugar and vanilla to medium-firm peaks — billowy but holding its shape.
In a 9×13 inch baking dish, spread a thin layer of whipped cream on the bottom. Layer graham crackers on top, breaking them as needed to fit. Spread a generous layer of whipped cream over the crackers. Top with a layer of the macerated strawberries, including some of their syrup. Repeat the layers — crackers, cream, strawberries — finishing with a thick layer of whipped cream on top. Arrange extra strawberry slices decoratively over the top.
Cover with plastic wrap and refrigerate overnight — at least eight hours. The crackers need this full time to absorb moisture from the cream and transform completely from crisp crackers into soft, tender cake-like layers. Cut into squares and serve cold.
Julia’s real tip: Eight hours minimum, overnight is genuinely better. An icebox cake pulled after only four hours has still-crunchy crackers in the middle. Eight hours produces the fully transformed, uniformly soft cake texture that makes this dessert what it is. Plan accordingly, you know?
Family verdict: Both kids went back for seconds at the first serving, which in a house with Jake the pickiest eater is a meaningful event. Dan declared it “better than any actual cake” which is a strong position that I think says more about icebox cakes than it does about my baking, but I’ll take it.
4. Mango Coconut Panna Cotta
Here’s the no-bake dessert that sounds the most technically impressive and is genuinely one of the most approachable things in this article — panna cotta is just cream set with gelatin, and it requires about ten minutes of stovetop work before going into the fridge to set. The mango coconut version is tropical and silky and beautiful in a glass, and it can be made up to two days ahead, you know?
What you need (serves 6): One 14-ounce can of full-fat coconut milk 1 cup of heavy cream 3 tablespoons of sugar 1 and a half teaspoons of unflavored gelatin powder 3 tablespoons of cold water to bloom the gelatin 1 teaspoon of vanilla extract A tiny pinch of salt
For the mango topping: 2 ripe mangoes, pureed until smooth 1 tablespoon of honey Juice of half a lime
Here’s how it goes: Sprinkle the gelatin over the cold water and let it sit for five minutes to bloom — it will absorb the water and become spongy, which is correct. Meanwhile, heat the coconut milk, cream, and sugar in a small saucepan over medium heat, stirring until the sugar dissolves and the mixture is hot but not boiling. Remove from heat, add the bloomed gelatin and the vanilla, and stir until the gelatin is completely dissolved. Pour into six small glasses or ramekins. Refrigerate for at least four hours until fully set.
Blend the mangoes with honey and lime juice until completely smooth. Spoon over the set panna cotta right before serving.
Julia’s real tip: Don’t boil the cream mixture — boiling can interfere with the gelatin’s setting power and also scalds the cream, which affects flavor. Hot but not boiling is exactly where you want it, and you can test this by placing a clean finger in the cream for a second — it should feel uncomfortably hot but not burning. That’s the right temperature, you know?
Family verdict: Maya called this “the most elegant dessert I’ve ever seen in our house,” which was a meaningful compliment delivered with complete seriousness. Dan ate his in three bites and immediately looked at the remaining glasses in the fridge to assess availability. Jake ate the mango topping separately and the panna cotta separately, which produced the same result as eating them together, so I’ve made peace with it.
5. No-Bake Lemon Cheesecake Bars
So here’s the dessert that satisfies cheesecake craving with zero oven involvement — a buttery graham cracker crust pressed into a pan, topped with a cream cheese and lemon filling that sets firm in the fridge, cut into bars. The whole thing takes about twenty minutes of work and then several hours of refrigerator patience, and the result tastes like a proper cheesecake without the anxiety of water baths and cracking and oven timing, you know?
What you need (makes 16 bars): For the crust: 2 cups of graham cracker crumbs — about 15 crackers blitzed in a food processor or crushed in a bag 6 tablespoons of unsalted butter, melted 3 tablespoons of sugar A pinch of salt
For the filling: 16 ounces of cream cheese, completely softened to room temperature One 14-ounce can of sweetened condensed milk Juice of 3 lemons and zest of 2 1 teaspoon of vanilla extract
Here’s how it goes: Combine the graham cracker crumbs, melted butter, sugar, and salt and mix until it resembles wet sand. Press firmly and evenly into the bottom of a 9×13 inch pan — use the flat bottom of a measuring cup to compact it properly. Refrigerate while you make the filling.
Beat the softened cream cheese until completely smooth — no lumps, this is the step that determines the final texture of the bars. Add the sweetened condensed milk and beat until smooth and combined. Add the lemon juice, zest, and vanilla and beat again until everything is incorporated. Pour over the chilled crust and spread evenly. Refrigerate for at least four hours, overnight is better. Cut into bars with a sharp knife dipped in warm water between cuts for clean edges.
Julia’s real tip: The cream cheese must be at real room temperature — left out for at least two hours — before you start. Cold cream cheese produces a lumpy filling that doesn’t smooth out no matter how long you beat it. Room temperature cream cheese beats to a completely smooth, silky consistency in about ninety seconds. Temperature matters more here than any other single step, you know?
Family verdict: These bars have appeared at every single summer gathering we’ve hosted or attended for the last two years. The pan comes home empty every time. Jake eats his with the crust ratio maximized, which means he’s scooped some extra crust from the edges. Maya considers these the ideal form of cheesecake. Dan ate four bars at our last cookout before I stopped counting.
6. Frozen Banana Nice Cream
Here’s the dessert that requires exactly one ingredient and produces something that tastes remarkably like ice cream — frozen bananas blended until smooth become a creamy, cold, soft-serve-like frozen treat that genuinely satisfies ice cream craving with nothing but fruit. I’ve been making this for the kids since Maya was about eight and it remains in rotation, you know?
What you need (serves 2 to 4): 4 large ripe bananas — the riper the better, spotted bananas produce the sweetest, most flavorful result Optional add-ins: 2 tablespoons of peanut butter, a tablespoon of cocoa powder, a teaspoon of vanilla, frozen strawberries or mango alongside the bananas
Here’s how it goes: Peel the bananas, slice into rounds, and freeze in a single layer on a parchment-lined tray for at least two hours. Once fully frozen, transfer to a food processor or high-powered blender. Blend on high, stopping to scrape down the sides as needed — it will go through a crumbly stage, then a thick paste stage, then suddenly smooth out into a creamy, whipped, ice-cream-like consistency. This takes about two to three minutes. Serve immediately as soft-serve or freeze for an hour for a scoopable texture. Add peanut butter or cocoa powder or other frozen fruit during blending for different flavors.
Julia’s real tip: The bananas need to be fully ripe — yellow with brown spots — before you freeze them. Underripe bananas make a starchy, slightly unpleasant version of this. Properly ripe bananas make something sweet and banana-forward that holds up on its own, you know?
Family verdict: Jake calls this “banana ice cream” and has accepted it fully as a real dessert. Maya makes it herself on weekend afternoons and experiments with different add-ins. The peanut butter version is her current favorite. Dan was genuinely surprised the first time he tasted it that it was just bananas.
7. No-Bake Chocolate Peanut Butter Oat Bars
These are the bars that straddle the line between dessert and snack — a press-in base of oats, peanut butter, honey, and coconut oil, topped with a layer of melted dark chocolate, and refrigerated until firm. They’re filling, they have real staying power from the oats and peanut butter, and they taste like a genuinely good dessert rather than a virtuous alternative to one, you know?
What you need (makes 16 bars): 2 and a half cups of old-fashioned rolled oats Half a cup of natural peanut butter A third of a cup of honey A quarter cup of coconut oil, melted 1 teaspoon of vanilla extract Half a teaspoon of salt
For the chocolate topping: 6 ounces of dark chocolate, chopped 2 tablespoons of coconut oil
Here’s how it goes: Combine the oats, peanut butter, honey, melted coconut oil, vanilla, and salt in a large bowl and mix until completely combined — it should hold together when you press a handful. Press firmly and evenly into a parchment-lined 8×8 inch pan. Refrigerate for twenty minutes to firm up.
Melt the chocolate with the coconut oil in a bowl over simmering water or in the microwave in thirty-second increments, stirring between each, until smooth. Pour over the chilled oat base and spread evenly. Refrigerate for at least one hour until the chocolate is fully set. Lift out using the parchment and cut into bars with a sharp knife. Store refrigerated.
Julia’s real tip: The coconut oil in both the base and the chocolate topping is what keeps these bars at the right consistency when cold — firm enough to hold their shape but not so hard that the chocolate shatters when you bite it. Don’t substitute butter, which produces a too-firm chocolate layer that cracks messily, you know?
Family verdict: Jake eats these for snack and doesn’t classify them as dessert, which I’ve decided is fine because they disappear regardless of category. Maya makes these herself regularly and considers them “the best thing that can happen in a refrigerator,” a designation I’m proud of.
8. Fresh Peach & Raspberry Trifle
Here’s the no-bake dessert that looks the most extravagant and assembles in about fifteen minutes from entirely store-bought and fresh components — layers of store-bought pound cake, whipped cream, lemon curd, and fresh summer peaches and raspberries, built in a glass trifle bowl or individual glasses. The overnight rest transforms the pound cake into something soft and creamy that tastes like it was baked to order, you know?
What you need (serves 8): One store-bought pound cake, cut into one-inch slices and then into cubes 2 cups of heavy whipping cream 3 tablespoons of powdered sugar 1 teaspoon of vanilla extract One jar of good lemon curd 3 ripe peaches, pitted and thinly sliced 1 pint of fresh raspberries Fresh mint to finish
Here’s how it goes: Whip the cream with the powdered sugar and vanilla to soft peaks — billowy and light. Layer the trifle in a large glass bowl or individual glasses in this order: a layer of pound cake cubes, a generous spoonful of lemon curd dotted across the cake, a layer of whipped cream, a scatter of peach slices and raspberries, and repeat. The top layer should be whipped cream with an arrangement of fresh peaches and raspberries over it and a few mint leaves.
Cover and refrigerate for at least two hours, overnight is better. The pound cake absorbs the cream and lemon curd and becomes luxuriously soft and tender.
Julia’s real tip: Scatter the lemon curd in small spoonfuls across each cake layer rather than spreading it in a uniform layer — this creates pockets of intense lemon flavor distributed through the trifle so every few bites has a concentrated hit of lemon curd against the cream and fruit. Spreading it evenly dilutes it into the background, you know?
Family verdict: This is the dessert I bring to summer dinner parties when I want something that looks genuinely impressive with minimal day-of effort. Maya considers this the most beautiful dessert presentation and has built her own version twice. Dan’s review: “You could charge money for this.” I found that very encouraging.
9. Watermelon Mint Granita
Here’s the completely no-equipment, no-skill frozen dessert that is also one of the most refreshing things I’ve made in any summer kitchen — watermelon blended with lime and mint, poured into a shallow pan, and scraped with a fork every thirty minutes as it freezes until it becomes a gorgeous ruby-red pile of icy crystals that melts almost instantly on your tongue, you know?
What you need (serves 6): 5 cups of seedless watermelon, cubed Juice of 2 limes 2 tablespoons of honey — less if your watermelon is very sweet A handful of fresh mint A tiny pinch of salt
Here’s how it goes: Blend the watermelon, lime juice, honey, mint, and salt until completely smooth. Pass through a fine mesh strainer for a cleaner result, or leave it with a little texture — both are good. Pour into a wide shallow metal pan or baking dish and place in the freezer.
Every thirty minutes, use a fork to scrape the frozen edges toward the center and break up any solid chunks that are forming. Repeat this every thirty minutes for two to three hours until the whole pan is a pile of icy, granular, ruby-colored crystals. Serve in chilled glasses immediately — granita melts quickly, which is part of its charm, and it should be eaten the moment it’s scooped, you know?
Julia’s real tip: The scraping intervals matter — if you leave it too long between scrapes, you get a solid frozen block instead of loose crystals. Set a timer every thirty minutes and stick to it for the first two hours. The commitment of those four or five scraping sessions produces genuinely perfect granita, you know?
Family verdict: Jake discovered that eating granita from a cold glass with a spoon is one of summer’s great experiences and has been asking for this since the first time I made it. Both kids eat it before it melts, which means quickly, which is the correct approach.
10. No-Bake Oreo Cheesecake
So here’s the no-bake dessert that produces the most unqualified universal enthusiasm in our family — a thick Oreo cookie crust, a cream cheese filling with crushed Oreos folded through it, a layer of whipped cream on top, and more crushed Oreos scattered over everything. It tastes exactly like what it is, which is one of the most satisfying desserts imaginable when you’re not trying to be subtle about it, you know?
What you need (serves 10 to 12): For the crust: 24 Oreo cookies, crushed to fine crumbs — about 2 cups 4 tablespoons of unsalted butter, melted
For the filling: 16 ounces of cream cheese, completely softened One 14-ounce can of sweetened condensed milk 1 cup of heavy whipping cream 1 teaspoon of vanilla extract 12 Oreo cookies, roughly crushed into chunks — not fine crumbs, you want pieces
For topping: 1 cup of heavy whipping cream, whipped with 2 tablespoons of powdered sugar 8 Oreo cookies, roughly crushed for scattering
Here’s how it goes: Combine the Oreo crumbs and melted butter and press into a 9-inch springform pan or 9×13 inch pan, pressing up the sides slightly if using the springform. Refrigerate while you make the filling.
Beat the cream cheese until completely smooth. Beat in the sweetened condensed milk and vanilla until fully combined. In a separate bowl, whip the heavy cream to stiff peaks. Fold the whipped cream into the cream cheese mixture until no white streaks remain. Fold in the crushed Oreo pieces. Spread over the chilled crust. Refrigerate for at least four hours, overnight for the best texture.
Before serving, top with the whipped cream and scatter the remaining crushed Oreos.
Julia’s real tip: The Oreo pieces folded into the filling will soften slightly as the cheesecake sets — this is correct and desirable, they become tender cookie pieces distributed through the creamy filling rather than crunchy chips that contrast awkwardly with the soft texture. Keep them as rough chunks, not fine crumbs, so they maintain some texture while still softening, you know?
Family verdict: Jake declared this “the best dessert in the world” on first taste, a position he maintains with complete conviction. Dan ate a genuinely concerning amount of it at one sitting and looked satisfied rather than regretful, which I think says everything. Maya ate hers slowly and photographed it first, obviously.
Why No-Bake Is the Summer Dessert Philosophy I Trust
Here’s the thing I’ve come to genuinely believe after multiple summers of making desserts with and without an oven — in summer, the best desserts are almost always cold. Not slightly cooled, not room temperature, but properly cold. Cold desserts taste refreshing in a way that warm baked goods simply can’t in July heat, and the refrigerator and freezer are far better at producing that chill than any dessert that starts warm and cools down, you know?
The other thing I’ve noticed is that no-bake desserts tend to use peak summer fruit more naturally than baked ones do. When you’re baking, you often cook down the fruit and lose some of its fresh quality. When you’re assembling a trifle or folding mango into panna cotta or making a fresh berry topping, the fruit stays fresh and bright and tastes like the season in a way that baked fruit sometimes doesn’t.
No-bake isn’t a compromise. For summer specifically, it’s genuinely the right approach, you know?
You’ve absolutely got this. Now go soften that cream cheese.
— Chef Julia


Discussion about this post