Here is a confession from someone who has spent fifteen years cooking professionally and still manages to go completely blank on lunch every single day of summer break. I was making sad lunches for a very long time. Dinner had been covered. Dinner receives attention, planning, good ingredients, and actual thought. Lunch, however, was whatever I could throw together in five minutes between answering emails and refereeing the arguments that Marisol and Tyler had decided to have on any particular Tuesday.
The turning point came last summer when Tyler looked at the fourth consecutive day of crackers, cheese, and whatever fruit had not yet gone bad and said—with the particular twelve-year-old energy that communicates disappointment without technically complaining—”Is this lunch?” I was standing there holding a sleeve of crackers, and I felt genuinely called out by my own child. I am a professional cook. I can do better. We all deserve better than an accidental lunch.
So I spent the better part of last July developing a wrap rotation that I could execute in under fifteen minutes, using ingredients that I could keep stocked all week, that travelled well enough for pool days and park trips, and that tasted good enough that nobody—not Tyler, not Marisol, not my husband who has strong opinions about lunch—would respond with anything other than enthusiasm.
Here is what I want to establish before we get into the recipes. A wrap is only as good as what is inside it and how it’s built. A wrap is not a sandwich with a different exterior. The structural logic is different. You need a balance of textures — something creamy, something crunchy, something fresh, and something with substance — and you need to distribute everything evenly so that every bite contains the full picture. Build the wrap with intention. That is the whole instruction.
I should also mention that wraps are one of the great make-ahead lunch victories of summer. The fillings for all of these recipes can be prepared on Sunday and stored separately in the refrigerator. You can assemble them fresh each morning in literally two minutes. Two minutes is less time than it takes to find the peanut butter in a pantry that two children have reorganized according to their own mysterious logic. These wraps are going to completely change your summer lunch situation.
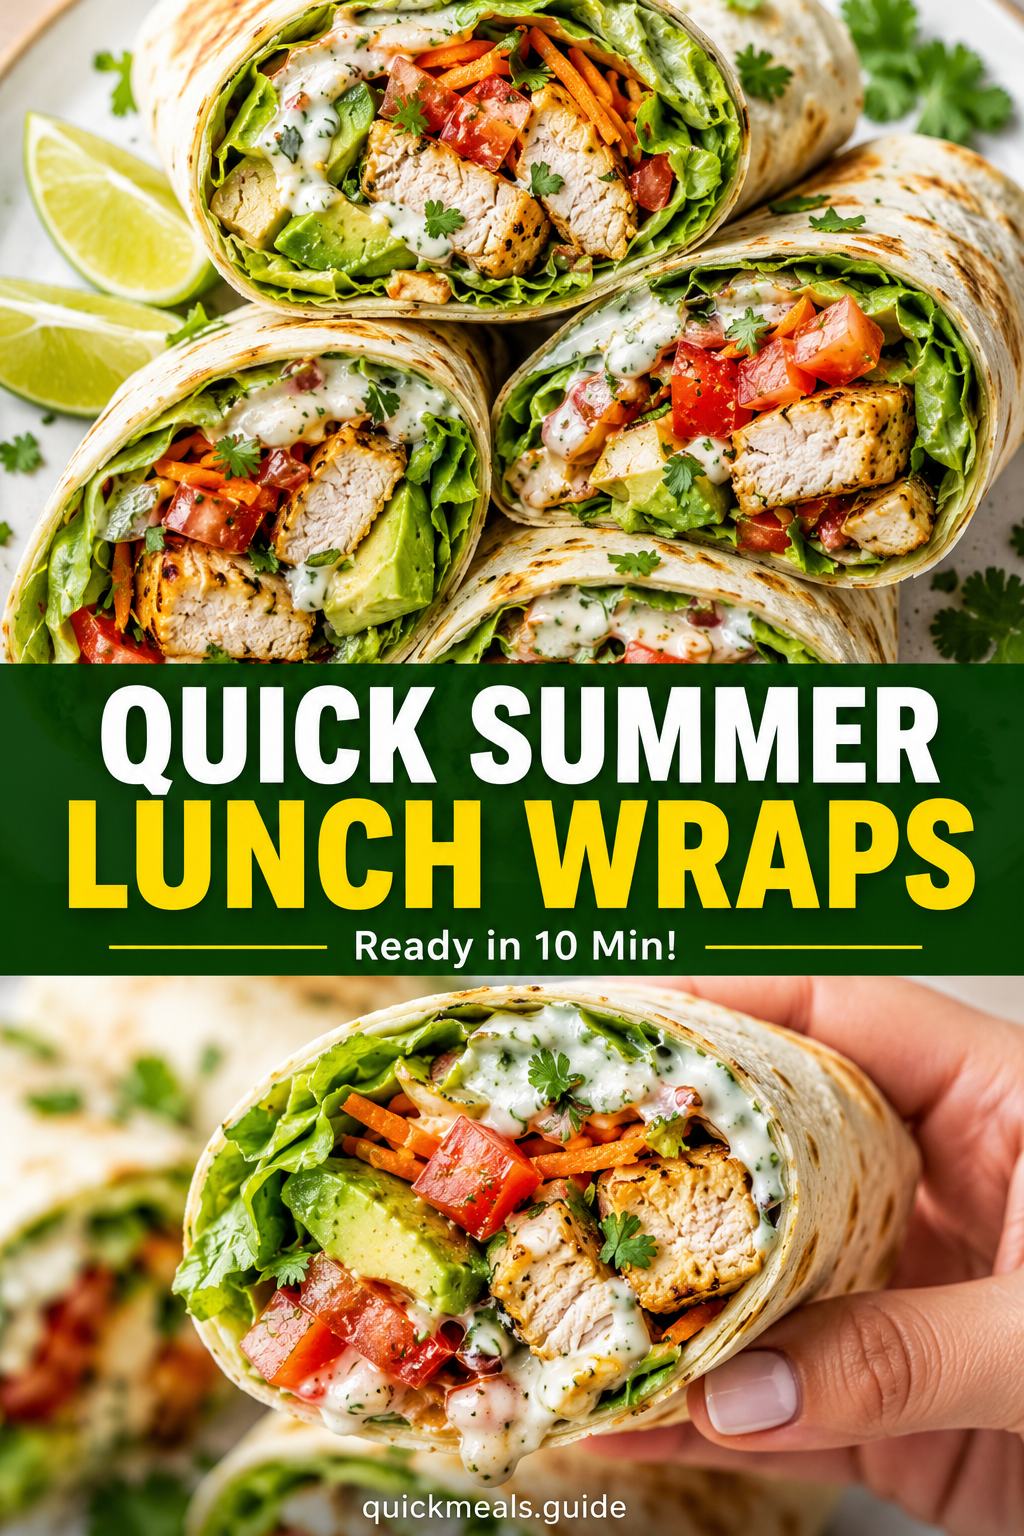
Wrap 01 — Greek Chicken Wrap with Tzatziki and Roasted Red Peppers
Time: 12 minutes | Serves: 4 | Effort: Easy
This is the wrap that my neighbor Karen texted me about at eleven o’clock on a Thursday morning, saying that she had just made it for lunch and had eaten it while standing at her kitchen counter because it was the best lunch she had had all summer. Eating while standing at the counter is the highest compliment a lunch can receive. It means you could not even wait to sit down. I know that feeling well.
Here is what makes tzatziki such an effective wrap spread. It performs three jobs simultaneously, which is exactly the kind of efficiency I want from a lunch ingredient. It serves as the sauce, the creamy element, and the seasoning, because a good tzatziki actually contains enough garlic, dill, and lemon to flavor everything it touches rather than simply adding moisture. Store-bought tzatziki is completely suitable here. I buy it during weeks when I have not made a batch myself, and it works beautifully.
Now, regarding the chicken. I use rotisserie chicken here, and I will continue to use and recommend it for the rest of my cooking life because it is genuinely one of the most practical weekday lunch shortcuts available. It is already cooked, already seasoned, and already tender enough to fall off the bone. It costs a little more than a raw chicken breast, but it saves considerable time and effort. Shred it and season it with a little lemon and oregano, and it tastes as though you specifically prepared it for this wrap.
Ingredients
- 4 large flour tortillas or flatbreads, warmed (warming them is essential — cold tortillas crack and tear)
- 2 cups rotisserie chicken, shredded (about half a bird — season with lemon juice, oregano, salt, and pepper)
- ½ cup tzatziki, store-bought or homemade
- 1 cup jarred roasted red peppers, drained and sliced into strips (they add sweetness and color that fresh peppers cannot match)
- 1 English cucumber, halved lengthwise and thinly sliced
- 1 cup cherry tomatoes, halved
- ½ cup kalamata olives, halved (optional for children — mandatory for adults)
- ½ cup crumbled feta cheese
- 2 cups baby spinach or romaine lettuce, roughly chopped
- Fresh dill, if available
- Salt, pepper, and a squeeze of lemon
Instructions
Step 1. Season the shredded chicken in a bowl—add lemon juice, a good pinch of dried oregano, salt, and pepper. Toss it well and taste it. The chicken needs to taste well-seasoned on its own because everything else in this wrap is relatively mild, and the chicken provides the backbone. Under-seasoned chicken results in an under-seasoned wrap, the worst possible outcome.
Step 2. Warm your tortillas—thirty seconds per side directly over a gas flame if you have one, or in a dry skillet if you do not, or wrapped in a damp paper towel in the microwave for twenty seconds if you are in a hurry. Warm tortillas are pliable and forgiving and can be rolled without cracking. Cold tortillas crack at the first fold, and the entire structure collapses immediately, which makes everything more difficult than it needs to be.
Step 3. Spread a generous amount of tzatziki across the center of each warm tortilla—not a thin scrape, but an actual spread that covers the middle third of the tortilla from edge to edge. The tzatziki is both the glue and the flavor foundation, and being stingy with it results in a dry wrap. Layer baby spinach over the tzatziki first—the greens go down before the wet ingredients, so that the tortilla does not become soggy from the tomatoes sitting directly on it.
Step 4. Add the chicken in a line down the center of the tortilla, then the roasted red pepper strips, cucumber slices, cherry tomatoes, olives (if using), and a generous crumble of feta over everything. The important layering instruction is this: distribute everything as evenly as possible along the length of the wrap rather than piling it all in the middle. Every bite should contain every component. A wrap where all the good filling is concentrated in the center and the ends are nothing but tortilla is not the wrap experience that anyone deserves.
Step 5: Fold in the sides of the tortilla first, then roll it from the bottom up as tightly as you can, being gentle enough not to tear it. The fold-then-roll technique keeps everything contained and prevents the filling from escaping out the ends. Cut the wrap diagonally in half—a diagonal cut exposes more of the filling visually, which makes the whole thing look more intentional and appetizing. Eat immediately or wrap tightly in parchment paper for transport.
Chef’s Notes and Family Verdict
Tyler removes the olives from his plate and places them on my plate with focused efficiency. I eat them. We have an arrangement that works well for both of us.
Marisol eats hers, cut into thirds, for reasons she has never explained. The child has a system. The wrap tastes the same in thirds.
This wrap travels exceptionally well. Wrap it tightly in parchment paper and twist the ends like a sweet wrapper, and it holds together perfectly in a bag for three to four hours. The tzatziki keeps everything moist without making the tortilla soggy if you pack it within about an hour of assembling. This is the pool day wrap, the park lunch wrap, and the wrap that makes other people at the picnic table ask what you are eating.
Variations I Have Tested
Use leftover grilled chicken from the previous evening’s dinner instead of rotisserie chicken. Season it the same way, and it is arguably better because the char from the grill adds a smokiness that works beautifully in this wrap. To make it fully vegetarian, swap the chicken for a generous scoop of hummus and add sliced avocado — the hummus provides protein and substance, and the wrap is so satisfying that nobody misses the chicken. Add a handful of arugula instead of spinach for a more peppery, bitter green that cuts through the richness of the tzatziki and feta, genuinely elevating the whole thing.
Wrap 02 — BLT Avocado Smash Wrap
Time: 10 minutes | Serves: 4 | Effort: Very Easy
This wrap requires the least cooking—technically only bacon, which is the most enjoyable cooking there is because the entire process smells wonderful and requires almost no skill—and it produces the most universally enthusiastic response from every member of my family simultaneously, which is a genuinely rare event that I document and celebrate each time it happens.
The BLT flavor combination has been absolutely correct for over a hundred years, and I see no reason to argue with that record. Salty, crispy bacon. Sweet, ripe summer tomato. Cool, crisp lettuce. In a sandwich or a wrap, it is one of the great American flavor combinations, and peak July is when it reaches its full potential, since tomatoes are extraordinary at that time of year. An extraordinary summer tomato in a BLT is a completely different experience from a February grocery store tomato. This is a seasonal recipe. Make it now, while the tomatoes are at their best.
The avocado smash is what transforms a regular BLT wrap into something more substantial and interesting. It replaces the mayonnaise—which I enjoy but does not travel as well—with smashed avocado seasoned generously with lemon, garlic, and salt. It provides the fat and creaminess the wrap needs while also adding substance that makes this feel like a proper lunch rather than a tortilla snack.
I made this for Marisol’s end-of-year art camp celebration last summer, and every single child at the table ate the entire wrap, including the ends, which, if you have children, you will understand is a minor miracle I accepted with great gratitude.
Ingredients
- 4 large flour tortillas, warmed
- 8 strips thick-cut bacon (cook until genuinely crispy—floppy bacon in a wrap is both a structural and textural problem)
- 2 large ripe summer tomatoes, thinly sliced (peak summer only — if the tomatoes are not at their best, wait)
- 2 cups romaine lettuce or iceberg, shredded (iceberg is actually better here because of its crunch)
- 2 ripe avocados
- Juice of 1 lemon
- 1 small clove of garlic, grated
- Salt and cracked black pepper
- ¼ teaspoon red pepper flakes (optional — adds a gentle background heat)
- 2 tablespoons mayonnaise (optional — adds extra richness)
Instructions
Step 1. Cook the bacon until it is genuinely and deeply crispy—not limp, not chewy, but crispy in the way that causes it to snap when broken. Floppy bacon in a wrap becomes soggy within minutes and loses its textural contrast with everything else, which is the entire purpose of including bacon in this wrap. Lay it on a paper towel-lined plate to drain and allow it to cool completely before building the wrap. Hot bacon wilts the lettuce immediately, and warm bacon is less crispy than cool bacon.
Step 2. Make your avocado smash while the bacon is cooling. Halve and pit the avocados, scoop the flesh into a bowl, and add the lemon juice, grated garlic, salt, pepper, and red pepper flakes, if using. Mash with a fork to a rough, chunky consistency—not smooth like guacamole, not left in large chunks, but somewhere in between, where the texture is interesting and substantial. Taste it. A properly seasoned avocado smash should taste bright, garlicky, and sharp from the lemon. If it tastes flat, it needs more salt and more lemon.
Step 3. Warm your tortillas and lay them flat. If you are using the mayonnaise, spread a thin layer across the center third of each tortilla. Spread a generous scoop of avocado smash over the mayonnaise or directly onto the tortilla—really spread it out in a thick, even layer across the middle of the tortilla, because the avocado is doing the primary work here. You want it present in every bite.
Step 4. Layer the shredded lettuce over the avocado. The lettuce goes between the avocado and the tomato specifically because the avocado acts as a barrier, preventing the tomato’s moisture from immediately soaking through to the tortilla. This layering logic is what keeps your wrap from becoming soggy before you finish eating it, and it genuinely matters. Lay the tomato slices over the lettuce and season them with a small pinch of flaky salt right away. Break the bacon strips into halves and lay them over the tomatoes.
Step 5. Roll tightly, cut diagonally, and eat immediately. This particular wrap does not keep well — the bacon begins to lose its crispiness within about 20 minutes, and a BLT wrap without crispy bacon is a problem I do not want anyone to face. Make it, eat it, and enjoy summer at its most satisfying.
Chef’s Notes and Family Verdict
Tyler ate his in approximately ninety seconds and immediately asked whether there was another one. There was not. I now make double batches. The lesson has been learned.
Marisol said this wrap “tastes like summer decided to be a sandwich,” which I wrote down immediately because it is a perfect description from an eight-year-old.
The only modification I make for pool-day transport is to leave the bacon out of the assembled wrap and pack it separately in a small container, then tuck the strips in right before eating. This takes five seconds and means the bacon is still crispy when we eat it forty-five minutes later. It is worth the extra container every time.
Variations I Have Tested
Add a properly fried egg — one with crispy edges — on top of the bacon layer for a breakfast wrap version that is one of the best things you can eat before a long summer day. Swap the bacon for turkey or prosciutto for a lighter version that still has the salty, cured-meat quality without the cooking step—prosciutto especially works beautifully with the avocado and tomato. Add a handful of microgreens or fresh basil leaves over the tomato for a more herbaceous, fresher finish that makes the whole wrap taste more complex without adding any meaningful effort.
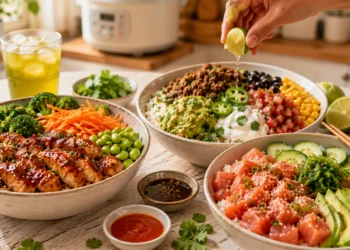
Wrap 03 — Spicy Tuna and Mango Slaw Wrap
Time: 12 minutes | Serves: 4 | Effort: Easy
This is the wrap that surprises people the most—not because the individual ingredients are unexpected, but because the combination sounds as though it should not work as well as it actually does. And then it works beautifully, and people look slightly betrayed by how much they enjoy it, which is my favorite reaction to food.
Here is your fruit that belongs in a savory wrap, and specifically why mango belongs here. The sweetness of ripe mango, against the spicy, salty tuna, a nd the tangy lime slaw, creates a contrast that makes every component taste more fully like itself. The spice is spicier. The sweetness is sweeter than before. The acid is brighter. This is the same reason we serve applesauce with pork and cranberry sauce with turkey—contrast makes everything more interesting, and summer mango is the best possible contrast for a spicy tuna situation.
I developed this wrap during a stretch of last summer when Tyler was in what I call his “restaurant phase”—insisting that everything we ate at home should taste like something you would order somewhere. This wrap passed that test completely. He said it tasted like a sushi restaurant had made a wrap, and he looked genuinely impressed, which, at twelve years old, meant he raised his eyebrows briefly before reassembling his expression into studied nonchalance. I saw the eyebrows. I know what they mean.
Ingredients
- 4 large spinach or whole wheat tortillas (the green tortillas add visual interest and hold up well with juicy fillings)
- 2 cans of good-quality tuna in olive oil, drained (quality matters enormously here)
- 3 tablespoons Japanese mayonnaise (Kewpie if you can find it — richer and slightly sweeter than regular mayonnaise)
- 1–2 teaspoons sriracha (adjust according to your audience)
- 1 teaspoon soy sauce
- 1 teaspoon sesame oil
For the mango slaw:
- 1 ripe mango, peeled and cut into thin matchsticks or small dice
- 2 cups shredded purple cabbage (purple for color—green cabbage works, but purple is more beautiful)
- 1 large carrot, julienned or grated
- 3 tablespoons rice vinegar
- 1 tablespoon honey
- 1 teaspoon sesame oil
- Juice of 1 lime
- Salt and a pinch of red pepper flakes
- Fresh cilantro or mint, roughly chopped
- 2 tablespoons sesame seeds
Instructions
Step 1. Make the mango slaw first so that it has a few minutes to marinate while you prepare everything else. Even ten minutes makes a real difference in how the flavors come together and how the cabbage softens slightly into something more silky and less raw. Toss the shredded cabbage, julienned carrot, and mango together in a bowl. Add the rice vinegar, honey, sesame oil, lime juice, salt, red pepper flakes, cilantro or mint, and sesame seeds. Toss well and taste—it should be sweet, tangy, and a little spicy, with the mango as the dominant flavor. Set it aside.
Step 2. Make your spicy tuna mixture. Drain the tuna well, pressing against the strainer to remove as much oil as possible, then break it up slightly with a fork. Mix in the Japanese mayonnaise, sriracha, soy sauce, and sesame oil until everything is combined. Taste it. Add more heat or more soy sauce as needed. The balance you are looking for is rich and creamy with a spicy kick that builds gradually rather than hitting you immediately and then disappearing.
Step 3. Warm your tortillas and lay them flat. Drain any excess liquid from the mango slaw—it will have released some juice as it sat—and avoid adding too much liquid to the wrap, as it will make the tortilla soggy quickly. A quick drain through a strainer or pressing gently with a spoon is all that is needed. Spread the spicy tuna mixture across the center of each tortilla in a generous line—this goes down first because it is the densest component and anchors everything else.
Step 4. Pile the mango slaw generously over the tuna. Do not be conservative here, as this slaw is the soul of the wrap, and you want it present in every bite. The color contrast between the purple cabbage and orange mango against the pale tuna is genuinely striking, making this wrap look like something you ordered rather than something you assembled in your kitchen in 12 minutes.
Step 5. Roll the wrap tightly—this filling is generous, and you need to roll with confidence—cut it diagonally, and serve immediately, or wrap it tightly in parchment paper for up to 2 hours. The slaw holds up remarkably well because the cabbage is sturdy and the mango does not release too much liquid after draining. This is a safe pool-day wrap as long as you keep it in a cooler, which you should be doing anyway since the tuna mixture needs to stay cold.
Chef’s Notes and Family Verdict
Tyler’s eyebrow moment has been described above. He ate the full wrap and then casually asked whether there was more slaw “just to eat,” which means he liked the slaw specifically and did not want to admit how much—something he does with food he loves. I find this endearing, though I do not let him know that.
Marisol asked if the purple vegetable was “magic cabbage” the first time I served it. I said yes. She ate it completely. I will explain the truth eventually, but not yet.
The mango slaw on its own is worth making in large batches and keeping in the refrigerator all week. It is excellent as a side dish alongside grilled fish, on top of pulled chicken, or eaten directly from the container as an afternoon snack, which I do regularly and without any regret.
Variations I Have Tested
Use canned salmon instead of tuna for a different flavor—slightly richer and more assertive—and the mango slaw pairs even better with salmon than with tuna. Replace the mango with diced pineapple for a more tropical direction that works particularly well if you add a little shredded coconut to the slaw. For a vegetarian version that still has the spicy, creamy element, use mashed avocado mixed with sriracha and a little soy sauce instead of the tuna mixture—the flavor profile is completely different. Still, the wrap’s structural logic remains the same, and the result is genuinely delicious.
Wrap 04 — Caprese Chicken Pesto Wrap
Time: 10 minutes | Serves: 4 | Effort: Very Easy
This is the wrap I make when I want lunch to feel like a reward rather than a refueling stop. Pesto, fresh mozzarella, summer tomatoes, and chicken in a wrap is a combination so fundamentally correct that I sometimes wonder why I ever eat anything else between July and August.
Here is what I want to say about pesto as a wrap spread, and I want to say it clearly. It is the single greatest wrap spread available to anyone. Anyone who has put plain mayonnaise on a wrap and felt vaguely unsatisfied should hear this. Pesto contains oil, herbs, garlic, cheese, and nuts, and it provides everything a wrap spread needs: richness, herb freshness, garlic depth, and cheese saltiness. It does the work of multiple condiments in a single scoop, and it costs very little if you have made a large batch from your summer herb garden, the farmers’ market, or the grocery store’s herb section. I use store-bought pesto during busy weeks and homemade pesto during weeks when I have time to make it, and both versions of this wrap are excellent. The homemade version is better. The store-bought version is still genuinely good and infinitely better than no pesto at all. Do not let perfect stand in the way of a really good Tuesday lunch.
Ingredients
- 4 large flour tortillas, warmed
- 2 cups rotisserie chicken, shredded (or any leftover cooked chicken)
- ⅓ cup basil pesto, store-bought or homemade
- 8 oz fresh mozzarella, sliced (not shredded — slices maintain their creamy texture better in a wrap)
- 2 large ripe summer tomatoes, thinly sliced (season them with flaky salt the moment they are sliced)
- 2 cups baby arugula (the peppery quality of arugula against the richness of pesto and mozzarella is the right combination)
- ¼ cup sun-dried tomatoes in oil, roughly chopped (optional — adds concentrated tomato depth)
- Balsamic glaze for drizzling (optional — makes everything taste more finished)
- Salt, cracked black pepper, and red pepper flakes
Instructions
Step 1. Toss the shredded chicken with about 2 tablespoons of the pesto directly in the bowl—this pre-seasons the chicken so it is flavored throughout, rather than only where the pesto happens to land in the wrap. Season the tomato slices with flaky salt as soon as they are cut, then allow them to rest for 2 minutes. Properly salted tomatoes taste significantly more alive and present than unsalted ones, and this step requires no meaningful effort.
Step 2. Warm your tortillas and spread the remaining pesto generously across the center of each one—more generously than seems right, because pesto absorbs slightly into the tortilla and what seems like too much during assembly will feel exactly right when you eat it. This is the one ingredient with which I actively encourage a heavy hand, because the consequences of too much pesto in a lunch wrap are considerably less serious than the consequences of too little.
Step 3. Layer the baby arugula directly on the pesto. The pesto acts as glue, keeping the arugula from sliding out of the wrap immediately, which is the structural problem with leafy greens in wraps and the reason they should never be placed first on a bare tortilla. Add your mozzarella slices in a single layer over the arugula, overlapping them slightly.
Step 4. Lay the salted tomato slices over the mozzarella. Add the pesto chicken in a generous line over the tomatoes. Scatter the sun-dried tomatoes over everything if you are using them. Drizzle a thin line of balsamic glaze along the entire length of the filling for a sweet, acidic finish that makes it wrap like it’s from a restaurant. Add a crack of black pepper and a pinch of red pepper flakes on top.
Step 5. Roll tightly, cut diagonally, and eat immediately or wrap in parchment paper within the hour. The mozzarella makes this wrap slightly more time-sensitive than the others because fresh mozzarella releases a little moisture as it sits—it is fine for an hour. Beyond that, the tortilla begins to get damp around the mozzarella. For longer transport, pack the mozzarella separately and add it at the destination. This takes ten seconds and is completely worth doing.
Chef’s Notes and Family Verdict
This is Marisol’s absolute favorite wrap in the entire rotation, and she requests it by name, which she calls “the green sauce wrap.” The green sauce wrap is made at least once a week from June through August in our house, and I have no complaints about that whatsoever.
Tyler calls it the “Italian wrap” and eats it with the kind of focused appreciation that tells me he is actually tasting it rather than simply refueling, which is the highest compliment a twelve-year-old can pay to a lunch.
My husband packed one of these for a work lunch last summer and texted me at noon to say that everyone in the break room was envious of his lunch and that he had told them his wife made it. I told him I would keep making it as long as he continued saying things like that. We are both very happy with this arrangement.
Variations I Have Tested
Swap the chicken for sliced prosciutto — two or three thin slices laid over the mozzarella before the tomatoes go on — for a more Italian deli-style direction that requires zero cooking and tastes impressively sophisticated for very little effort. Use ricotta spread thickly on the tortilla instead of pesto for a creamier, milder version that Marisol actually prefers sometimes—ricotta with fresh basil and tomato is essentially deconstructed lasagne in a wrap, and it is wonderful. Add thin slices of zucchini from the previous evening’s grilled vegetables for a more substantial vegetable-forward version that uses leftovers beautifully.
Wrap 05 — Southwest Black Bean and Corn Wrap with Chipotle Lime Crema
Time: 15 minutes | Serves: 4 | Effort: Easy
This is the wrap that makes a vegetarian lunch feel genuinely exciting rather than like something you are eating because all the other options have run out. It is bold, smoky, and a little spicy. It has enough textural interest—the crunch of fresh corn, the creaminess of black beans, the heat of the chipotle crema, and the coolness of the shredded cabbage—that you finish it feeling fully satisfied rather than looking for something else to eat because lunch did not quite land.
Here is what I want to say about the Chipotle lime crema, because it is the ingredient that makes this wrap work. I make extra every time I prepare this wrap and use it on everything else for the rest of the week — on tacos, on grilled corn, as a dip for vegetables, and drizzled over fried eggs in the morning. It takes three minutes to make, costs almost nothing, and improves everything it touches.
Chipotle peppers in adobo are one of those pantry ingredients I keep on hand year-round because they do so much with so little money and effort. They are smoky, spicy, slightly sweet, and deeply complex. One or two peppers from a can added to almost anything creates depth of flavor that would take an hour to develop by any other method. I buy the cans, use one or two peppers, and freeze the rest flat in a zip-lock bag, where they keep for months, and I can break off exactly the amount I need. This is a technique from professional kitchens that I want every home cook to have.
Ingredients
- 4 large flour or whole wheat tortillas, warmed
- 2 cans black beans, drained and rinsed (15 oz each)
- 2 ears fresh corn, kernels cut off (or 1½ cups frozen corn, thawed and dried)
- 1 cup shredded purple or green cabbage
- 1 cup cherry tomatoes, quartered
- 1 ripe avocado, sliced
- ½ red onion, very finely diced
- 1 teaspoon cumin
- ½ teaspoon smoked paprika
- ½ teaspoon chili powder
- Salt and pepper
- 2 tablespoons olive oil
- Fresh cilantro
- Lime wedges
For the Chipotle lime crema:
- ½ cup sour cream or full-fat Greek yogurt (yogurt makes it lighter and tangier)
- 1–2 chipotle peppers in adobo, finely minced (start with one pepper if you are cautious about heat)
- 1 teaspoon of the adobo sauce from the can (do not discard this—it is pure concentrated flavor)
- Juice of 1 lime
- ½ teaspoon garlic powder
- ½ teaspoon honey
- Salt to taste
Instructions
Step 1. Make the chipotle lime crema first, since it genuinely improves even after five minutes of resting. Mince your chipotle pepper as finely as possible so that there are no large chunks — you want the heat and smokiness distributed evenly throughout the crema rather than concentrated in a few aggressive bites. Mix it with the sour cream or yogurt, adobo sauce, lime juice, garlic powder, honey, and salt. Stir well and taste. Adjust the smokiness, spice level, and brightness of the lime until it is exactly as you want it. Place it in the refrigerator while you work on the filling.
Step 2. Warm the olive oil in a skillet over medium-high heat. Add the corn kernels and cook without stirring for two minutes—you want some caramelization on the corn, not simply warm corn, because the slightly charred bits are what make this filling taste grilled and summery rather than assembled from pantry ingredients. Add the black beans, cumin, smoked paprika, chili powder, salt, and pepper. Cook, stirring, for another two to three minutes until the beans are heated through and everything smells smoky and wonderful. Taste and adjust the seasoning—this filling needs to be bold because it is doing the primary flavor work of the wrap.
Step 3. In a small bowl, toss the shredded cabbage with a squeeze of lime juice, a tiny pinch of salt, and a small drizzle of olive oil. You want the cabbage to have a little brightness and seasoning rather than sitting raw and plain in the wrap, but not so much dressing that it makes the wrap wet.
Step 4. Warm your tortillas and spread a generous amount of chipotle lime crema across the center of each one. Add the dressed cabbage layer, then a scoop of the warm corn and bean filling, then sliced avocado, then cherry tomatoes, and red onion. Scatter fresh cilantro over everything and add a final squeeze of lime directly over the filling before you roll it—this brightens everything at the last moment and makes the whole wrap taste more vivid.
Step 5. Roll tightly and cut diagonally. The warm filling against the cool crema and cool vegetables creates the temperature contrast that makes this wrap particularly satisfying. Eat it immediately while that contrast is at its best. If you are packing it for travel, allow the filling to cool to room temperature before assembling so that the tortilla does not become soft and compromised before you eat it.
Chef’s Notes and Family Verdict
Tyler declared this “the spicy one” on his first bite—which is accurate—and then continued eating the entire wrap, which tells you everything about his actual relationship with spice versus his stated one. He asked me to make the crema “a little spicier” the second time. We are now using two full peppers. I am proud of his growth.
Marisol asked me to put the crema “on everything” for approximately two weeks after I first made it, and I largely agreed because it genuinely complements almost everything. She is not wrong to request this. The cream on scrambled eggs one morning was one of the better breakfast decisions of the summer.
This is the most make-ahead-friendly wrap in the whole rotation. The bean and corn filling keeps in the refrigerator for four days and actually develops more flavor as the spices deepen. The crema keeps for five days. If you make both on Sunday, this wrap takes literally three minutes to assemble all week, which is the kind of efficiency that genuinely changes how summer feels.
Variations I Have Tested
Add shredded rotisserie chicken to the bean and corn filling for a more protein-forward version that still has all the same smoky Southwest flavors—the chicken absorbs the spices beautifully, and the crema brings everything together. Replace the sour cream in the crema with tahini, then thin it with a little water for a dairy-free version with a completely different but equally excellent flavor profile—the sesame-and-chipotle combination is unexpected and wonderful. Use the filling and crema in a breakfast burrito with scrambled eggs and a little cheese on weekend mornings—this is exactly what I do with leftover filling, and it is one of the best breakfasts that summer has to offer.
My final thought on summer lunch is this. It deserves as much attention as dinner—not more time, not more complexity, but simply the same basic respect for good ingredients and proper seasoning, and the understanding that the person who is eating it deserves a lunch that actually tastes as though something good happened in the kitchen. Fifteen minutes. A good tortilla. Something creamy, something crunchy, something fresh, and something that is actually well seasoned. That is the whole formula. That is summer lunch. Now go and make it.
Happy cooking, friends! — Chef Julia ✦ Chicago, IL


Discussion about this post