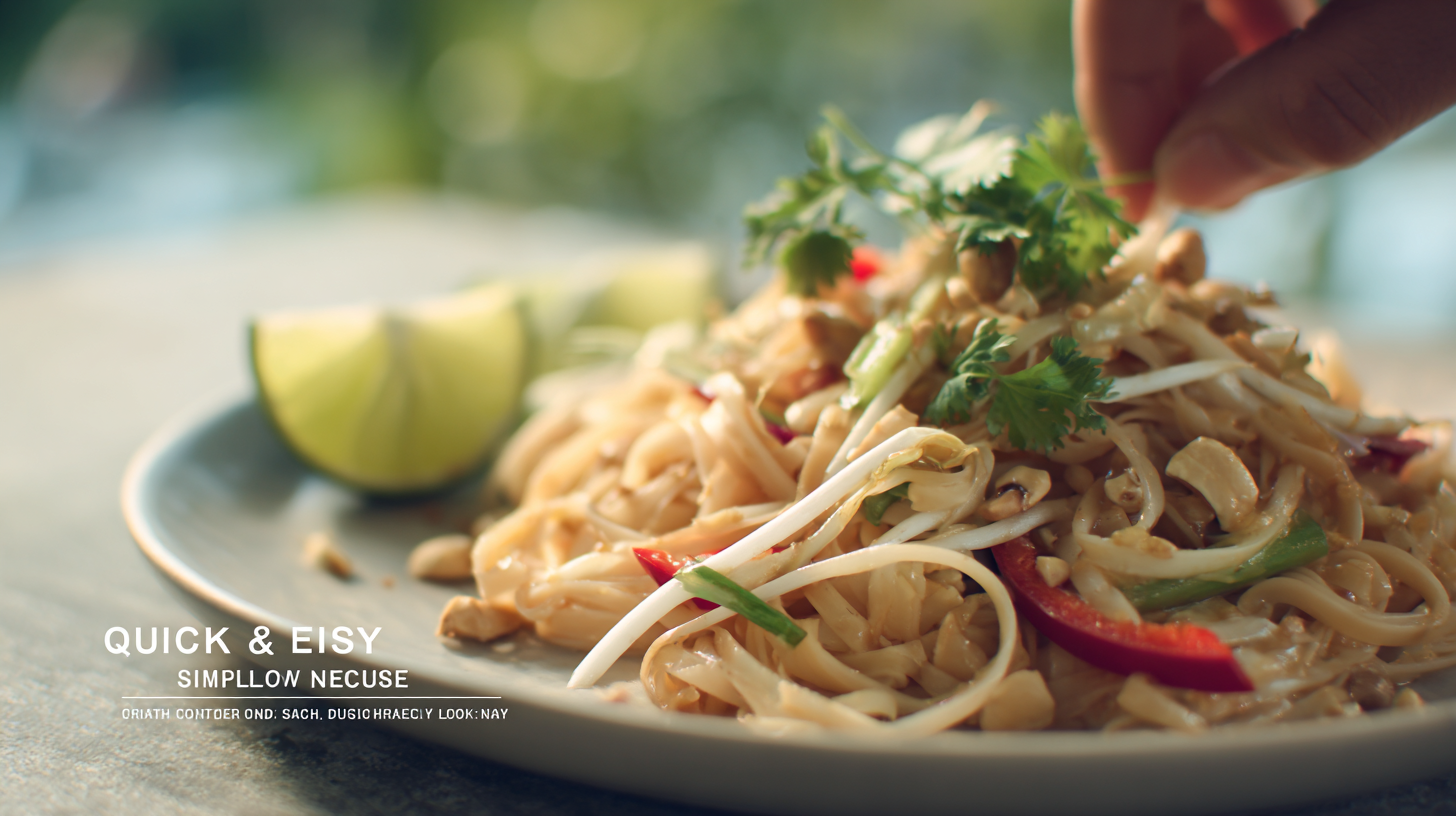
Pad Thai that tastes as if it came from a restaurant in just 20 minutes
Stop looking at the takeout menu. You don’t need a wok, a trip to an Asian market, or a culinary degree to satisfy your craving for sweet, sour, and nutty noodles. You need to wait 20 minutes.
This is real pad thai for weeknights, not the kind that needs three special sauces and a carbon steel pan that has been used for decades. We’re using a regular skillet, replacing the lime juice with tamarind paste (with a fair comparison), and skipping the tofu-pressing marathon that no one has time for.
You won’t have to worry about smoke alarms or what to do with the ingredients. You’ll get crispy-edged tofu, silky noodles that don’t clump into a sad brick, and that sticky glaze that makes you want to eat more.
If you’ve ever ended up with a pan of sticky rice noodle mush or tofu that fell apart into sad crumbs, this version is your do-over. We’re cooking the protein first, taking it out, and then making the sauce in the same pan, so nothing burns while you chop peanuts like crazy.
**A Quick Look at the Recipe:
- Prep Time: 7 minutes, plus 15 minutes for the noodles to soak on their own
- Time to Cook: 10 minutes
- Total Time Spent Active: 20 minutes
- Number of servings: 4
- Dietary Labels: Vegetarian, Easy Vegan, Gluten-Free (with changes)
Why This 20-Minute Method Works
I’ve ruined pad thai in every way possible, from boiling the noodles until they were mushy to making the sauce turn into cement and the tofu stick to the pan, as if it owed me money.
This recipe comes from testing over 40 different stovetops, from strong gas burners to picky electric coils. I taught this same method to a friend who once set toast on fire, and she got it right the first time.
The secret to home-kitchen pad thai: Traditional pad thai needs very high heat and quick wok movement that home stoves can’t do. Most restaurant wok burners put out more than 20,000 BTUs, while your home burner only puts out about 12,000. The answer isn’t to try to match that heat; it’s to work smarter.
What makes this method work is
The “Remove and Return” Method: Instead of trying to cook tofu, eggs, and noodles all at once (which turns everything into mush on home burners), we cook each part separately, set it aside, and then put it all back together at the end. Each part gets the right kind of high-heat treatment.
Controlled Temperature Management: We heat the pan until it smokes for the tofu, then adjust the temperature during the sauce phase. This keeps the sugar from burning while still slightly caramelizing it, which is what you want.
The Cornstarch Trick: Don’t bother pressing tofu between books for 30 minutes. A thin layer of cornstarch on the surface absorbs moisture immediately and forms a crispy crust that doesn’t stick to the pan.
My honest thoughts on being real:
- About 85% of the time, lime juice and brown sugar taste like tamarind. I’ll tell you when it’s worth looking for real tamarind paste.
- You don’t have to use eggs; the sauce sticks to just tofu and noodles for a vegan version.
- On home stoves, a regular skillet works better than a wok. The FAQ has more information on that!
Things You Need
Every ingredient has a reason for being there. Here’s what to get and why it matters.
The Noodle Foundation
8 oz of flat rice stick noodles that are about ¼ inch wide
The package should say “Pad Thai” or “Stir-Fried Rice Noodles.” “Do NOT use rice vermicelli (the thin, angel-hair kind) because it gets mushy when you stir-fry it. The flat noodles give it that chewy, full bite that you expect.
How to Soak: Cover with hot tap water (not boiling) for 15 minutes. When you drain them, they should bend easily but still have a white core that’s slightly stiff.
The Protein
14 oz of extra-firm tofu
It has to be extra-firm, and because of the cornstarch trick, no pressing is needed. Don’t use soft or silken tofu; it will turn into pudding.
2 tablespoons of cornstarch
The secret to crispy tofu is not pressing it for 30 minutes. Makes a starchy coating that turns golden when fried.
2 big eggs (optional)
Scrambled into the pan for more protein. If you’re vegan, leave it out, or add more tofu to make up for it.
The Sauce
3 tablespoons of soy sauce (or tamari if you can’t eat gluten)
Lime juice from 2 limes (about 3 to 4 tablespoons)
3 tablespoons of brown sugar
1 tablespoon of rice vinegar
1 tablespoon of tamarind paste (optional)
If you can, use this instead of 1 tablespoon of lime juice for a more authentic taste. But lime juice works great on its own.
The oil and aromatics
3 cloves of garlic, chopped finely
Only fresh garlic; jarred garlic burns too quickly when cooked at high temperatures.
**3 tablespoons of vegetable oil, split
It is very important to have a high smoke point. Canola oil or avocado oil works excellently. Don’t use olive oil; it doesn’t taste good here and can smoke at high heat.
The Toppings (Very Important!)
½ cup of roasted peanuts, chopped roughly
Fresh cilantro, cut into small pieces
Optional but traditional: bean sprouts
Lime wedges to serve
Extra things you can add: Sliced green onions, red chili flakes, and sriracha
What You Need
Important:
- A 12-inch non-stick or well-seasoned cast-iron skillet (a wok is great but not necessary; see the FAQ for more information).
- Tongs or two wooden spatulas (to pick up and toss the noodles without breaking them)
- Big bowl (to soak the noodles in)
- Small bowl (to mix the sauce before the cooking starts)
- Paper towels (to dry off the tofu)
Helpful but not necessary:
- Colander (to drain noodles)
- A small bowl for cracked eggs
Instructions in Steps
Prep Phase (7 Minutes of Active Work and 15 Minutes of Passive Soaking)
Step 1: Soak the Noodles (Do This First!)
Put the rice stick noodles in a big bowl. Fill the sink with hot tap water, but not boiling water. Put aside for 15 minutes.
When they’re ready, they should bend easily, but the white core should still be a little stiff. If they are completely soft and see-through, you have soaked them for too long (they will turn mushy when cooked).
To keep them from sticking, drain them well in a colander and add 1 teaspoon of oil. Put aside.
**Step 2: Prepare the Sauce
In a small bowl, mix:
- 3 tablespoons of soy sauce
- Juice from two limes (save the squeezed halves for more wedges)
- 3 tablespoons of brown sugar
- 1 tablespoon of rice vinegar
- 1 tablespoon of tamarind paste (if you want to)
Whisk until the sugar is completely gone.
Taste Test: The sauce should taste very sweet and sour, almost too much. Don’t worry; it will get a lot less spicy when it hits the hot pan and coats the noodles.
Step 3: Get the Tofu Ready
Cut the block of tofu into 1-inch cubes. Use paper towels to pat the moisture off the surface. Lightly toss the cubes with cornstarch until evenly coated.
This cornstarch coating makes the outside crispy when fried and saves you hours of pressing.
Step 4: Mise en Place (Get Everything Ready)
Cut up the peanuts. Chop the garlic into small pieces. If you’re using eggs, crack them into a small bowl. Keep your drained noodles, sauce, and toppings close by.
This is very important: This dish cooks very quickly once the garlic hits the pan. Everything needs to be ready and set up. Stir-fry doesn’t wait for anyone!
Cooking Time (8–10 Minutes)
Step 5: Make the Tofu Crispy (5 minutes)
Put 2 tablespoons of oil in your skillet and heat it over medium-high heat until it shimmers. You should see the oil ripple, but it shouldn’t smoke.
Put the tofu cubes in a single layer, leaving space between them. The most important thing is to leave them alone for three full minutes. This creates a golden crust and prevents them from sticking.
After 3 minutes, turn the cubes over and cook for 2 more minutes, or until golden on more than one side.
Put the crispy tofu on a plate. Don’t give in to the urge to taste them all!
Step 6: Scramble the Eggs (1 minute)
Put the last tablespoon of oil in the pan that is still hot.
Add the beaten eggs. Let them sit on the bottom for 10 seconds, then gently stir them into big, soft curds. Take the eggs off the plate with the tofu while they are still a little wet. They will finish cooking when you put them back on the noodles later.
Don’t do this step if you’re making vegan pad thai.
Step 7: Add the noodles and aromatics (2 minutes)
Set the heat to HIGH. Put the minced garlic in the pan and cook for 30 seconds, or until fragrant but not browned.
Add the noodles right away after draining them. For one minute, use tongs to toss the strands around and try to separate them. The noodles should start to get soft and see-through.
The Sizzle Test: When you put the noodles in the pan, you should hear a sizzle. Your pan isn’t hot enough if it doesn’t make any noise. If it’s smoking a lot, turn down the heat a little.
Step 8: The Sauce Moment (2 minutes)
Don’t pour the sauce right onto the noodles; instead, pour it around the edges of the pan. This lets the sauce hit the hot surface and begin caramelizing before it coats the noodles.
For two minutes, keep tossing. The noodles will absorb the liquid and start to caramelize a little. They should be shiny and have a coat.
Fixing problems:
- Add 1 tablespoon of water if the noodles look dry.
- If they’re soupy, cook them for another 30 seconds to remove excess liquid.
Step 9: Put everything back together (1 minute)
Put the scrambled eggs and crispy tofu back in the pan.
Toss everything in the sauce and heat for about a minute to coat everything. The noodles should be soft but chewy, with a shiny glaze that clings to them rather than pooling at the bottom.
**Step 10: Put on a plate right away
Put in bowls. Add plenty of chopped peanuts, fresh cilantro, and a lime wedge on top.
Serve right away with extra lime on the side. The acid fades as the dish sits, but the last squeeze at the table “wakes up” all the flavors.
Tips from Experts for Making the Best Pad Thai
Don’t Overcook the Noodles: The worst thing you can do is soak the noodles until they are mushy. They should still be a little stiff when you drain them. They’ll finish cooking in the pan.
Hot Pan, Cold Ingredients: Before adding each ingredient, make sure your pan is hot enough. That sizzle is important for getting the food to brown instead of steam.
Try the Sauce First: If it doesn’t taste strong and spicy in the bowl, it won’t have enough flavor when it’s mixed with all those noodles.
Cook Quickly: You have about 4–5 minutes to cook once the garlic is in the pan. You shouldn’t answer texts or look for the cilantro right now.
Notes on Storage
Truthfully, Pad Thai is a toxic leftover. Rice noodles soak up sauce quickly and become a solid, sticky mass in a few hours. You should eat this dish right away.
But you CAN get ready ahead of time:
- Mix the sauce (it will last for 5 days in the fridge)
- Cut up the peanuts and cilantro
- Cut tofu into cubes and coat them in cornstarch (use within a few hours)
- Soak the noodles and then drain them (use within 1–2 hours)
When you’re ready to eat, cook it fresh!
Tasty Changes
Extra Veggie Version: Add sliced bell peppers or snap peas with the garlic and cook for one minute before adding the noodles.
Peanut Pad Thai: To make the sauce taste richer and nuttier, stir in 2 tablespoons of creamy peanut butter.
Spicy Version: When serving, add 1 teaspoon of sriracha to the sauce and more chili flakes.
Shrimp Pad Thai: Use 12 ounces of peeled shrimp instead of tofu. Cook for 2 minutes on each side, or until pink, then add them to the eggs.
Low-Carb Option: Use spiralized zucchini instead of half of the rice noodles (add the zucchini only in the last 2 minutes).
Information about nutrition
For Each Serving (serves 4):
| Nutrient | Amount |
|---|---|
| Calories: 420 | |
| Protein | 16 g |
| Fiber | 3g |
| Fat | 18 g |
| 52 g of carbs | |
| Sodium | 16 g |
Main Benefits:
- Tofu is a good source of plant-based protein.
- Has healthy fats from peanuts
- Naturally free of dairy
- Simple to make vegan and gluten-free
Questions People Ask a Lot
Do I need a wok, or can I use my regular frying pan? **
Your skillet works BETTER than a wok on a home stove! Woks need a lot of heat (20,000 BTUs or more) to work right, but most home burners only go up to 12,000 BTUs. A flat skillet has more surface area in contact with the heat source, which means better browning and less steaming. Use what you have!
My rice noodles always turn into a solid brick. What am I doing wrong? **
Two common reasons are not enough oil and cooking them too long while they are soaking (they should be a little stiff when drained, not completely soft). Before cooking, always toss the drained noodles with a teaspoon of oil. If your pan is small, cook the noodles in two batches so they don’t get too crowded.
Could you please let me know where I might find tamarind paste and whether it is essential? **
You can find tamarind in the “international” or Asian aisle, where it is often sold in blocks or as a concentrate. The combination of lime juice and brown sugar gives you about 85% of the real flavor. It’s great for cooking on weeknights. If you make pad thai once a month, treat yourself to tamarind. If this is your first time, stick with lime.
How can I make tofu crispy without pressing it for an hour? **
Your shortcut is cornstarch! It quickly absorbs moisture from the surface and makes a starchy crust when fried. Before you add the tofu, make sure the pan is hot. Don’t move the cubes for the first three minutes; this will make the crust that keeps them from sticking.
**Is it possible to make this gluten-free?
Yes! Instead of regular soy sauce, use tamari. Also, check your rice noodles again (most are naturally gluten-free, but some contain wheat starch). The rest of the ingredients in this recipe are naturally gluten-free.
Why does my pad thai taste bland even with the sauce?
You probably aren’t seasoning enough. Before you add it, taste the sauce. It should be tart enough to make your cheeks pucker. Always serve it with fresh lime wedges, too. The acid “wakes up” the flavors at the table in a way that the heat from cooking does not.
Can I prepare pad thai ahead of time?
No, really. Rice noodles soak up sauce quickly and become a sticky solid in a few hours. You can, however, prepare all the parts (sauce, chopped toppings, and cubed tofu) separately and cook them fresh when you’re ready to eat.
Last Thoughts
This Quick Vegetarian Pad Thai shows that even beginner cooks can make Asian food that tastes as good as it does when it comes from a restaurant. You don’t need a wok, a trip to a specialty Asian market, or any cooking experience.
The crispy cornstarch-coated tofu, silky noodles that really separate, and that famous sweet-sour-nutty sauce make a meal that is just as good as takeout… and it costs a lot less and is ready in 20 minutes.
The key is to work smart: soak the noodles in hot (not boiling) water, cook the protein separately before making the sauce, and have everything ready to go before you start cooking. When you put the garlic in the hot pan, you have to race to the finish line to build up the flavor.
Stop looking at the takeout menu. You can do this!
Do you love quick Asian-style meals? Take a look at our collection of beginner-friendly recipes and simple weeknight meals that will help you feel more at ease in the kitchen!


Discussion about this post